
If you are a regular SD card user, you may have dealt with a corrupted SD card at some point. It can be quite frustrating when you try to access the SD card on your computer, phone, tablet, or camera, only to get the error message “unable to read”. In some instances, the SD card just disappears from the system, without displaying any warning messages. In this article, we will focus on showing you how to fix the corrupted SD card.
Top 7 Ways to Fix Corrupted SD Card
1. Try a Different USB Port
If you have been trying to connect the SD card to your computer via 1 USB port, the USB port could be the problem. It could be damaged. Also, a software glitch could make the USB port unusable. Try other ports available on the computer to see if your issue will disappear.
2. Try Using the SD Card on a Different PC
It is not uncommon for PCs to have issues. These issues could make the SD card appear corrupted. To determine whether the SD card is actually corrupted, try using it on a different computer. If the SD card works perfectly on a different PC, this means that the first computer could have issues. If the SD card fails to work on more than 1 computer, this means that the SD card has issues.
3. Try Changing the Drive Letter
In some instances, the computer may be unable to assign a drive letter to the SD card. This makes the files you have on the storage media inaccessible. The ideal way to solve this issue is to assign a drive letter to the SD card manually.
To learn how to deal with the SD card corrupted issue by changing the drive letter, follow the steps we have outlined below:
Step 1: Connect the SD card to your PC. You can use an external card reader. Avoid connecting the SD card via a camera or smartphone.
Step 2: Right-click on This PC or My Computer. On the menu that appears, select Manage.
Step 3: On the left-hand side, choose Disk Management. Wait for a couple of seconds while Windows loads the Virtual disk service.
Step 4: Right-click on the SD card and then select “Change Drive Letter and Paths”.
Step 5: After adding a drive letter, click on it to select it. Next, tap Change.
Step 6: When prompted, select the drive letter from the drop-down list and then click Ok.
4. Re-Install the Drivers
If the drivers running your SD card get corrupted, you may end up having the SD card not working issue. The ideal way to fix the driver corruption issue is to simply reinstall your drivers. To fix the SD card not working without formatting, follow the steps outlined below:
Step 1: Right-click on This PC/My Computer. Select Manage.
Step 2: Choose Device Manager on the left-hand side.
Step 3: Double-click Disk Drives from the list. Right-click on the SD card name.
Step 4: Tap Un-install and then click OK.
Step 5: Disconnect the SD card and then restart the computer.
Step 6: After the computer finishes turning on, connect the SD card. Wait to see whether the PC will have the ability to discover your SD card.
5. Try Checking for Errors on Windows
Windows has a feature that allows its users to look for issues in storage media and fix them. This feature can help you fix the SD card corrupted without formatting. To learn how to fix corrupted SD card via the check disk feature, follow the steps below:
Step 1: Connect the SD card to your computer.
Step 2: Launch the Windows Explorer. Locate the SD card, right-click on it and select Properties.
Step 3: On the Properties menu, locate the Tools tab and click on it.
Step 4: Under Error-checking, tap the Check button. Windows will start looking for any errors on your SD card. If the computer finds any errors, it will ask you if you would like to fix the issues. Go ahead and try fixing the issues.
6. Use Chkdsk Command
If the solution above did not produce the desired results, you can try the Chkdsk command. With the SD card connected to your PC, follow the steps we have outlined below to perform an SD card fix:
Step 1: Press the Windows key + S. On the search bar, type CMD. On the results, right-click on the command prompt and then choose open as administrator.
Step 2: Check the drive letter for the SD card. To see the drive letter, simply open the file explorer.
Step 3: Type Chkdsk g: /f where g is the SD card drive letter and f is a windows Chkdsk command.
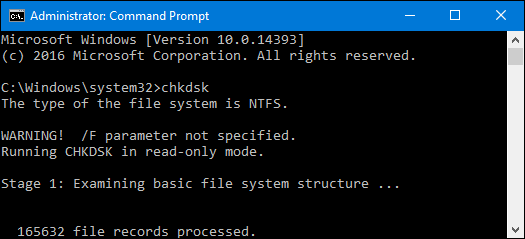
Step 4: Press Enter. Give the computer a couple of minutes for it to perform the SD card repair.
7. Try Formatting the SD Card Via the Windows Format Tool
If you can avoid this solution, avoid it. The reason why you should try to avoid formatting your SD card is that you will lose all your data. If you have already tried the solutions outlined above without succeeding, try formatting your SD card using the steps outlined below:
Step 1: After opening This PC or My Computer, right-click on the corrupted SD card.
Step 2: From the menu that appears, select Format.
Step 3: On the popup window that appears, select Restore Device Defaults.
Step 4: Initiate the formatting process by clicking Start. To get the computer to perform a deep scan, uncheck the Quick format option.
Note: If you uncheck the quick format option, the deep scan will take longer to complete.
Step 5: On the dialog box that warns you that you will lose your data, click OK. Allow the format process to complete.
8. Forcefully Format the SD Card Using the Command Prompt
If you could not fix the corrupted SD card via the normal format described above, you can try to forcefully format the SD card using the CMD. To learn how to fix corrupted SD card via force-formatting, follow the steps we have outlined below:
Step 1: Connect the SD card to your computer.
Step 2: Hover the mouse cursor over the start button. Right-click the start button.
Step 3: From the menu that appears, select Command Prompt (Admin). The CMD window should open.
Step 4: Type diskpart and then hit Enter.
Step 5: Type list disk and hit Enter. The storage devices connected to your computer should be displayed.
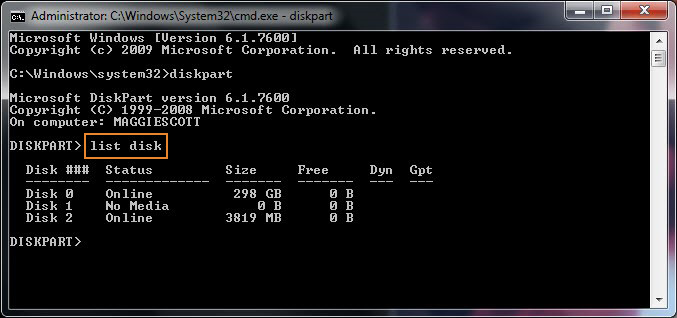
Step 6: Type select disk [the disk number] and hit Enter. Example, select disk 1
Note: Ensure that the disk number is for the SD card. To check whether you have selected the right disk, type list disk again. On the list of storage media, you should see an asterisk on the selected disk.
Step 7: Type Clean and then hit Enter.
Step 8: Type create partition primary and click Enter.
Step 9: Type active
Step 10: Type select partition 1
Step 11: Type format fs=fat32 and hit Enter. The format process should initiate and finish within a couple of minutes or seconds.
Note: If your goal is to carry files featuring a size of more than 4GB, type NTFS instead of fat32. Avoid closing the command prompt until the formatting process finishes.
Recover Your Photos from a Corrupted SD Card
If you had been using your SD card on a smartphone or a camera, chances are, the SD card has some of your important photos. They could be your own photos or important client photos. If the SD card gets corrupted, accessing the pictures becomes impossible. With the right data recovery software, however, recovering the pictures should be easy. The easiest way to recover photos from an SD card is via the use of FindMyPhoto.
On top of being easy to use, FindMyPhoto is extremely quick. Within a couple of minutes, you should get all your lost pictures. FindMyPhoto is compatible with almost every Android device. As long as your device is running on Android 4.1 and up, you should be able to use FindMyPhoto without any issues.
When using FindMyPhoto to recover your pictures, you incur zero costs. The application is 100% free. The application does not feature any hidden fees, annual subscription fees, or special memberships. When using the application, you won’t have to deal with Ads. This gives you a smooth experience.
FindMyPhoto Key features
- The tool has an integrated deep scan feature. This feature makes it possible for you to find all your lost pictures, irrespective of whether you lost them recently or you lost them a while back.
- On top of helping you recover photos from corrupted SD card, the application is capable of recovering deleted photos.
- You can use FindMyPhoto to recover your photos from a vault whose password you cannot remember.
- The application is extremely fast. Within a couple of seconds, it will locate all your pictures and recover them.
- FindMyPhoto allows you to preview your photos before recovery. You get to recover only the important pictures.
- The application features a nice user interface. You will not require any technical skills to recover all your pictures.
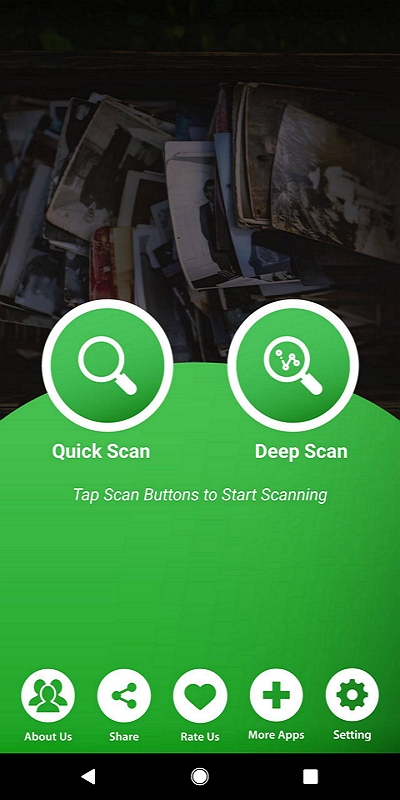
How to Recover Your Photos Using FindMyPhoto
To get your photos back using FindMyPhoto, you will need to follow the steps we have outlined below:
Step 1: Download FindMyPhoto for free and launch it.
Step 2: Click the Tap to Recovery button. Next, give FindMyPhoto a couple of seconds for it to finish looking for your lost pictures.
Step 3: After the scan, your lost pictures will be displayed. Preview the photos and select the ones you would like to get back. To get the pictures back, simply tap the Select and Recovery button available on the bottom-right corner.
Summary
If you have a corrupted SD card, the solutions outlined in this article may help you fix it. It is important to note that the solutions we have outlined above are general solutions. If your SD card features device-specific problems, the solutions may not work. However, before giving up on the SD card, try all the solutions. Formatting the SD card, as noted earier on, will erase your data. Therefore, try it as the very last solution.