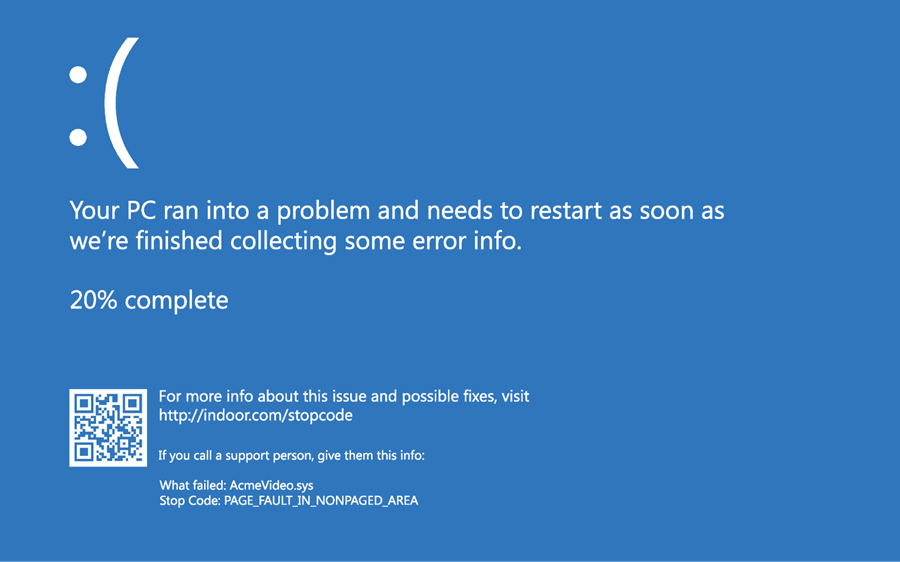
Have you ever experienced a “page fault in nonpaged area” issue on your device? These issues can be incredibly frustrating to stumble across, but that doesn’t have to mean that they are impossible to overcome.
Fortunately, our experts are on hand today to help you find out a little more about how to fix a page fault in a nonpaged area; hopefully, this will help you find the most suitable solution for your needs, too.
What Does “Page Fault in Nonpaged Area” Mean?
Before we go further, the first important factor here is to consider what the page fault in a nonpaged area means.
The page fault in a nonpaged area error typically occurs when a file was saved but cannot be found by your Windows device.
With this in mind, this can cause numerous potential issues, such as random BSOD crashes. Naturally, this means that data loss will have occurred on the device, as well, which you may need to look for ways to repair – such as with a specialist file recovery tool. Don’t worry – we’ll look at this in a little more detail once we get further into today’s guide.
Why Does the Windows PC Show “Page Fault in Nonpaged Area”
There are several potential reasons that a Windows PC might show the page fault in a nonpaged area error.
1. It occurs most often when Windows is attempting to open a file that it expects to be present but which doesn’t load in the location it anticipated.
2. There are numerous causes for these files to be lost or otherwise not found, but the most common cause is usually due to a failed, cancelled, or aborted Windows update.
3. In addition, faulty RAM or a general software issue may have caused the problem, which can leave your device facing a lot of difficulties.
Depending on the file in question, it’s important to note that usually, a page fault in a nonpaged area error won’t stop you from using the device entirely. However, it may have complications and challenges for your device; for example, if you experience a page fault in a nonpaged area, you may continue to face difficulties every time you attempt to load the file in question (or run any process that relies on this particular file).
As such, if you notice this error occurring on a regular basis, the lost file is likely to be an important one.
How to Fix a “Page Fault in Nonpaged Area” Error (4 Ways Included)
At this point, we have considered some of the different features of the page fault in a nonpaged area error. However, it is highly important to consider that fixing this error is absolutely possible – so, before you begin panicking about how to fix this issue, be sure to consider this carefully as part of your overall decision.
1. Test the RAM
Before attempting anything else, the first thing you may want to do is to test the RAM to see whether this is the cause of the page fault in a nonpaged area error.
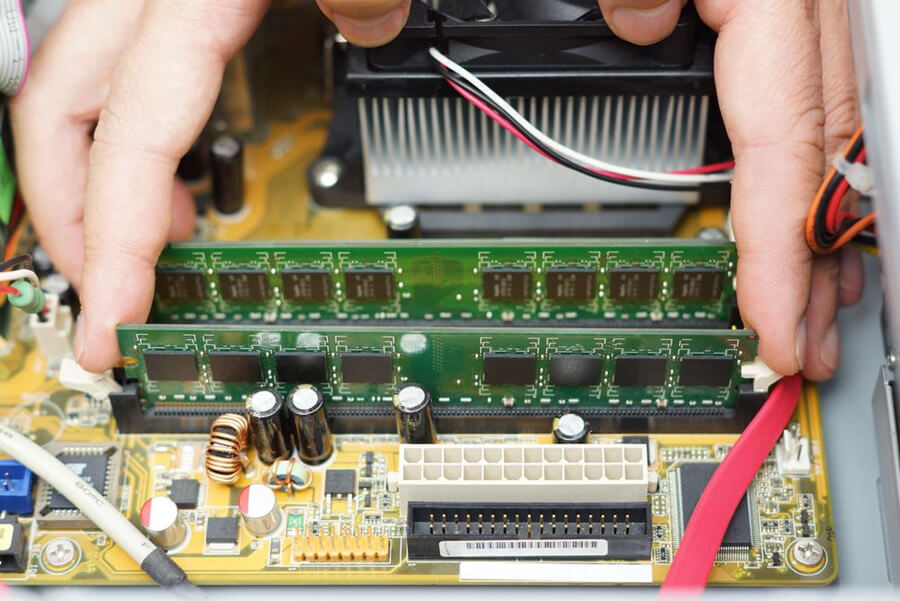
If you’re not sure, you may want to take your device to a professional at this stage, as it does require you to remove the side panel of the PC. Of course, you must turn your PC off before you attempt to remove the side panel.
Step 1. Once you have removed the side panel, the next step is to remove the battery.
Step 2. Then, unplug the device’s power cords, which will allow you to remove the RAM and check for any physical issues, such as a build-up of dust in the area.
It’s also important to consider here that any scratches or obvious damage to the RAM could also be the cause of this error.
Step 3. Once you have removed the old RAM chip, and if you haven’t noticed any physical issues, you may want to replace the RAM chip.
Step 4. Then, once the RAM is replaced, restart the computer to see if this prevents the issues from occurring.
2. Update Your Device’s Drivers
Another common issue that can cause the page fault in a nonpaged area error to occur is out-of-date drivers; as such, updating your device’s drivers may be a simple way to resolve this issue.
This is, fortunately, a very simple process to fix.
Step 1. Open File Explorer, and then select This PC.
Step 2. Right-click this to bring up the Manage option, and then head to System Tools > Device Manager.
Step 3. Head to Disk Drives and select either “Uninstall Device” or “Update Driver” to continue.

Step 4. Finally, restart your PC to determine whether this will have resolved the issues.
3. Run Windows Memory Diagnostics and Hardware Troubleshooter
One tool that should be inbuilt into your Windows PC for recovering lost data is the Windows Memory Diagnostic tool. It’s not as powerful as the StarzSoft Data Recovery app (as we’ll outline later), but it could be a good starting point to try and fix the error.
Step 1. Simply search for the Windows Memory Diagnostics tool from your PC’s search bar, and bring up the app.
Step 2. This will present several options: simply select “restart now and check for problems” to begin the scan of your device.
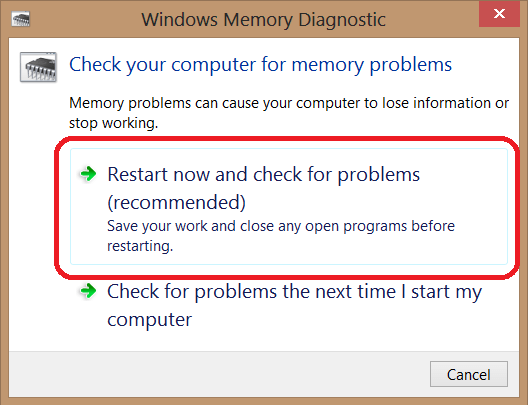
You should always ensure that your work is fully saved prior to completing this process, as you could potentially lose any unsaved data; don’t rely on the unsaved data function to prevent it from being wiped!
If this method hasn’t worked, you could also try running the Hardware Troubleshooter. This is easy to access by heading to Settings > Troubleshoot > Hardware and Devices; then, simply select “run the troubleshooter” to initiate the troubleshooting process.
4. Disable Anti Virus
If you’re not confident with removing the RAM or if this didn’t fix the issue, another common fault could be that your device’s Anti Virus systems are to blame.
Indeed, if you have recently downloaded third-party external Anti Virus systems for your PC, you may need to disable the built-in Windows Defender Anti Virus. However, this naturally comes with risks as it could leave your device more open to issues such as viruses or malware; if possible, don’t take this risk.
Note
How to Recover Lost or Unsaved Data While the Page Fault in Nonpaged Area [HOT!]
At this point, we’ve outlined some of the key things you should know about fixing a page fault in a nonpaged area error on your device. However, if any of your data has been lost during this time, fixing the issue won’t recover the data alone in most cases.
With this thought in mind, a specialist file recovery tool may be needed instead. Fortunately, this is where the StarzSoft Data Recovery tool comes in, offering a simple solution to overcome lost data.
What makes the StarzSoft Data Recovery tool so effective?
As one of the easiest and simplest data recovery tools to use, the tool is one of the most effective solutions for recovering lost data from your PC.
It has a fast and deep scanning speed for high efficiency.
It has 4 ways to filter the found files to help you find your lost files more quickly.
The high recovery rate makes it stand out in the industry.
So, if you need a new option to recover important data on your PC, the tool might be just what you need.
StarzSoft Data Recovery is also incredibly simple to use overall. It’s also much more powerful than the Windows Memory Diagnostic tool, so if that hasn’t worked, it could be your next port of call.
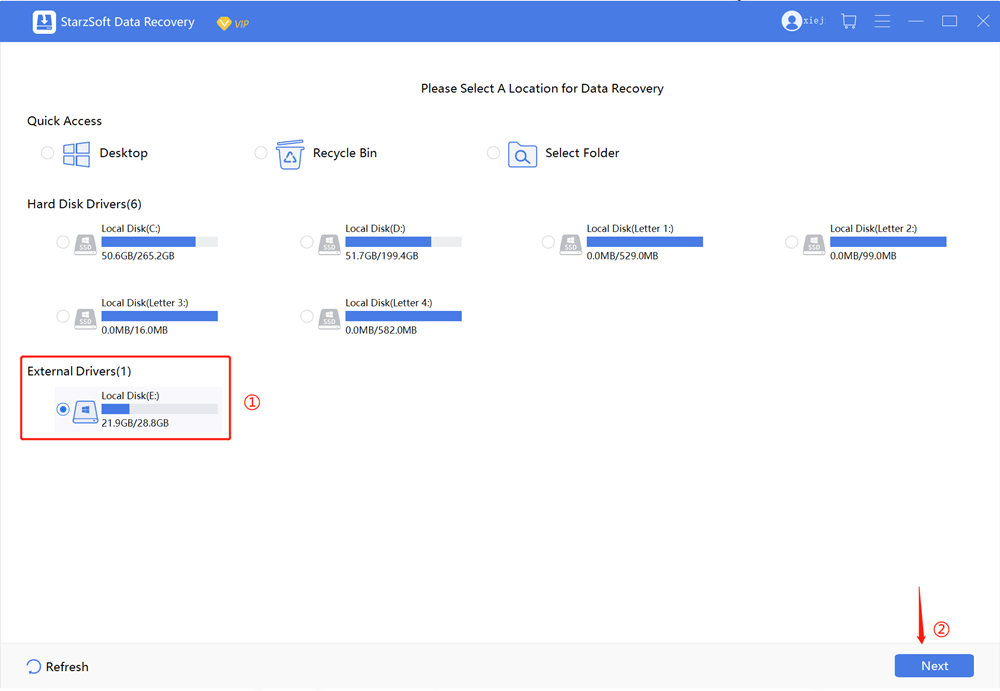
Step1. First, download and launch the app on your PC device, which will bring you to the home screen of the software;
Step2. From here, you’ll be able to select an appropriate location to attempt to recover.
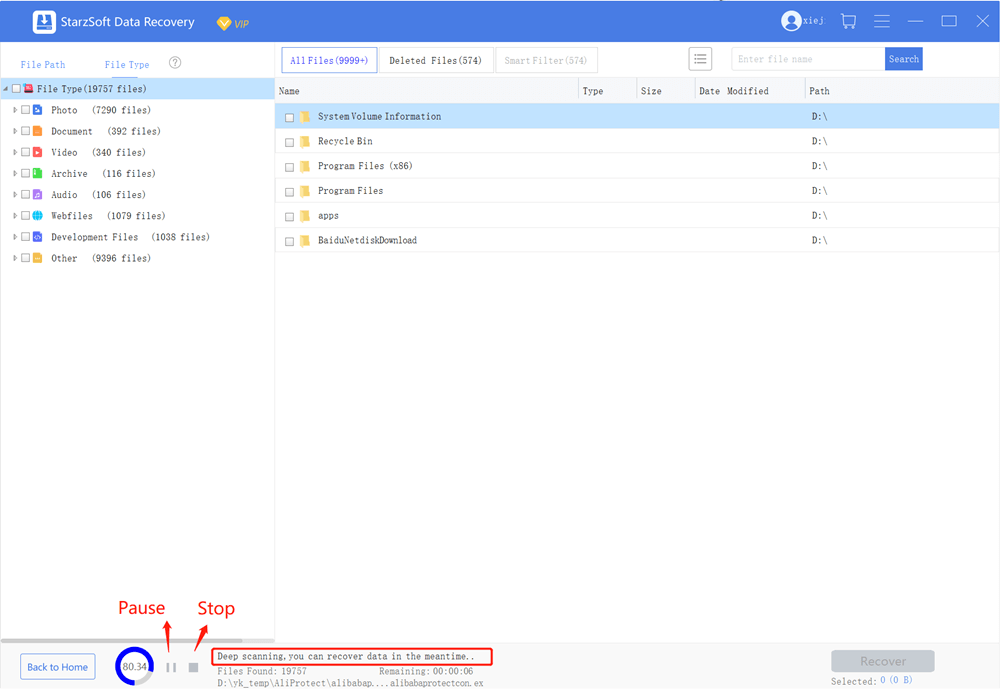
Step3. Initiate a scan of the file to allow the software to begin detecting and searching for any missing data;
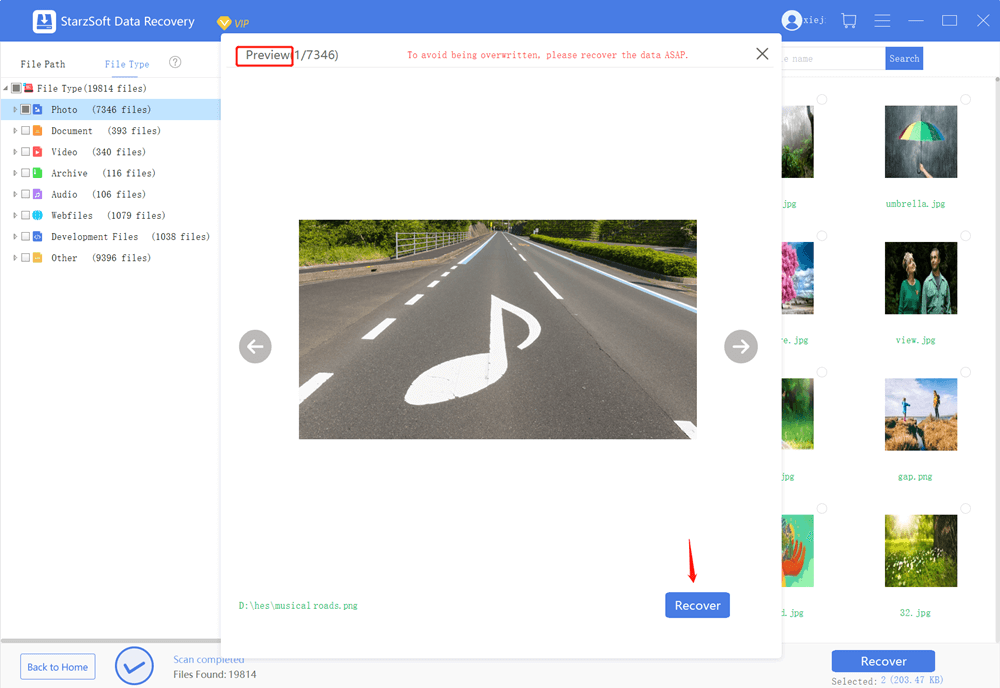
Step4. Preview any data that StarzSoft uncovers to determine whether this might be what you need.
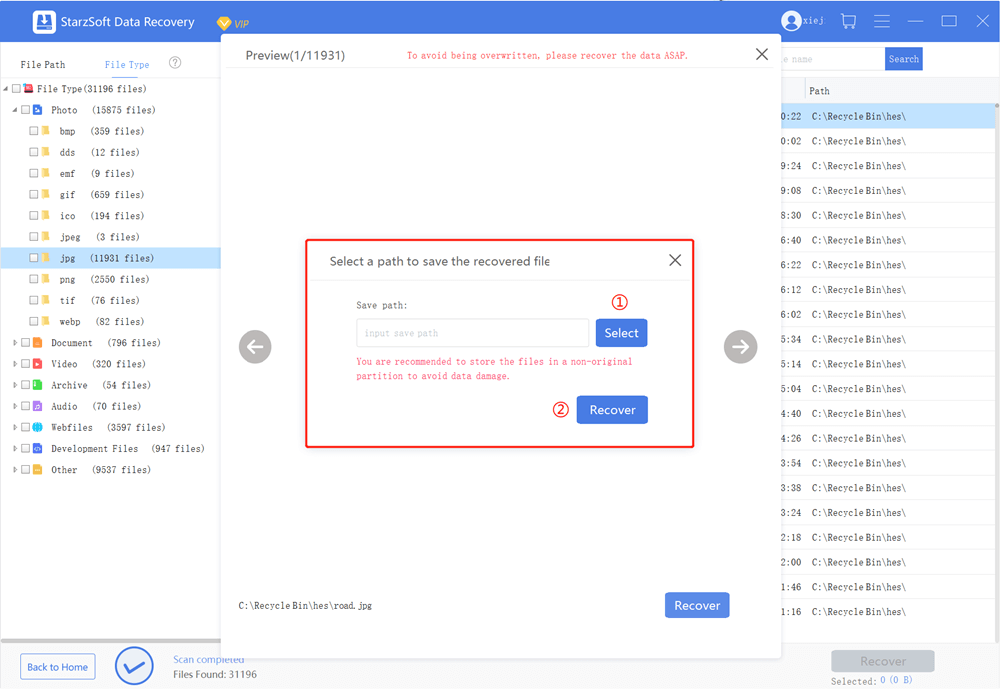
Step5. If it is, you’ll then be able to recover the data easily to your device, helping you get back to normal with using your PC!
Of course, it’s worth considering here that the StarzSoft Data Recovery tool may also highlight other lost files that you didn’t even know about during this process. As such, we recommend you check any files you’re not aware of to ensure you don’t miss out on data recovery when you need it most.
Conclusion
Experiencing a page fault in a nonpaged area error can be incredibly frustrating, and even more worryingly, it can also represent a significant risk of data loss! However, if this is something you have experienced with your own device, don’t panic – overcoming this issue doesn’t have to be an impossible goal.
With tools such as StarzSoft Data Recovery, re-obtaining your lost data becomes significantly easier, helping ensure that you are able to get the most from your device usage overall. So, if you experience this issue with your device, be sure to try a professional solution to resolve the data loss on your own device, too.
Free DownloadSecure Download