
Losing important notes can be frustrating. If you are in Kim’s situation, you would probably want to know how to recover deleted notes on iPhone. In this article, we will focus on showing you the best ways to recover deleted notes on iPhone. Before that, let’s see the major reasons why notes may disappear on your iOS device.
Why You Can’t Find Notes You Saved on Your iPhone?
1. Deleting Your Email Address
Similar to the contacts, calendars, and emails you have on your iDevice, your notes are often stored “in the cloud”. When we say “in the cloud”, we simply mean that the notes are often stored on a server tied to the email address registered on your iPhone/iPad.
Often, when notes disappear, they may not be deleted. One of the reasons that you may not find your important notes is deleting an email address from your iDevice. Deleting the email address often results in moving your notes too. What this means is that your iDevice will not have the ability to access your notes. However, if you happen to set up the email account on the iDevice again, the notes should become available.
2. Your iDevice Can’t Access Your Email Address
If your iPhone/iPad is having trouble connecting to your email account, this could be another reason. Maybe you changed your email password online and forgot to update it on your iPhone or iPad. The iDevice won’t be able to access the email account. Hence, accessing the notes may be impossible. To update your email password so that you can access your notes again, follow the steps below:
Step 1: Launch Settings on the iDevice and tap Mail, Contacts, Calendars.
Step 2: Tap on the email account whose password you would like to update. After updating your password, everything should return to normal.
3. Deleting the Notes
If you saved the notes for future reference, chances are, you wouldn’t delete the notes. However, someone could take your iPhone and delete the notes. Also, you could delete the notes by accident and forget about it.
Generally, after deleting your notes from either your iPad or iPhone, you should have approximately 30 days before the notes are completely removed from the iDevice. During this period, you can recover the deleted notes from iPhone very easily. If you did delete the notes more than 30 days ago, you may need to use a notes recovery tool to access the notes again.
How to Recover Deleted Notes on iPhone or iPad?
1. Undelete the iPhone Notes from the “Recently Deleted” Folder
As we have already mentioned above, after deleting your notes from your iDevice, you will still have approximately 1 month to recover deleted notes on iPhone before they are completely erased. After deleting a note from your iPhone or iPad, the note will be sent to the Recently Deleted folder. The Recently Deleted folder is a temporary folder. The note will not be permanently deleted until you open the Recently Deleted folder and delete the note for the second time.
If you deleted a note by accident less than 30 days ago, the steps we have outlined below should help you learn how to recover deleted notes on iPhone 6 from the Recently Deleted folder:
Step 1: After launching the Notes application on your iPad or iPhone, tap the Back arrow. The Back arrow should move you out of the Notes application and into the folder view.
Step 3: Tap the Recently Deleted folder to open it and then click the Edit button.
Step 4: Select the note you intend to recover by tapping on it.
Step 5: Click the “Move to” button and then select the Notes folder.
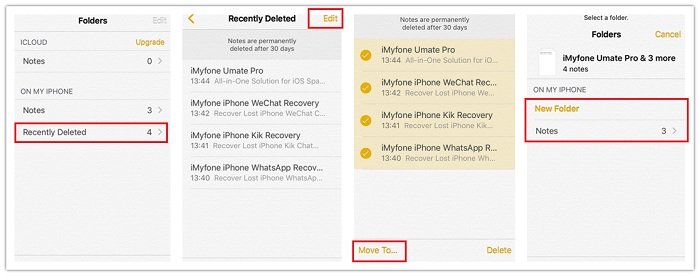
The selected note will be transferred o the Notes folder. Next time you open your Notes app, the note should be available.
2. Retrieve the Deleted Notes from iPhone Using Email Account
Maybe right now you are asking yourself, “can you recover deleted notes on iPhone using the email account?” You will be happy to know that the answer to this question is yes. While the email account solution is not solid, it does work.
Maybe you have used a Gmail, Outlook, Yahoo, or another email to set up on the iDevice. If you remove the email account, as we had mentioned earlier on, your notes may disappear. This does not mean that the notes have been deleted. If you resync the Notes option, you should be able to get your notes back. Below, we show you how to recover deleted notes on iPhone by resyncing the Notes option:
Step 1: Launch Settings and then click on Accounts & passwords.
Step 2: Tap on Yahoo (or Outlook, Gmail, and other cloud servers). Slide the Notes switch to the on position. After a while, your lost notes should be available on your iDevice.
Note: It is also possible to log into the email account you use on your iDevice online and check if the lost notes are available. If you are using Yahoo, a Notes folder should be available. If you are using Gmail, you can check the Trash or All Mail folder.
3. Using the iPhone Data Recovery Tool to Recover Deleted Notes
While the solutions we have shown above do work, there is no guarantee that they will actually help you recover lost notes on iPhone. The best solution you can use to recover notes from iCloud and on iPhone is a data recovery tool. The data recovery tool should help you recover deleted notes on iPhone from both backup files and your iDevice.
A good example of a tool you can use to recover notes on iPhone is known as SynciOS Data Transfer. The tool will help you get back your data quickly and easily. The tool will not require you to have any technical knowledge for you to recover your deleted notes. Below, we show you the simple steps you need to follow to recover your lost data using a data recovery tool known as SynciOS Data Transfer.
Retrieve from iTunes Backup
If you had created an iTunes backup, there is a very high likelihood that your lost notes may still be available on the backup file. To learn how to recover permanently deleted notes on iPhone from iTunes, follow the simple steps we have outlined below:
Step 1: After launching the notes recovery tool, select “Recover from iTunes Backup File”. This should display all the iTunes backups you have on the computer. Select the appropriate backup file and then tap the Start Scan button.
Note: When recovering your lost notes from iTunes, you do not need to connect your iPhone or iPad to the computer.
Step 2: After the scan, you can preview the lost files. If you intend to only recover notes, just tick Notes on the left-hand column. Select the notes you intend to recover. To recover lost notes on iPhone, click Recover.
Directly from iPhone
If you deleted your notes a few days ago, there is a likelihood that the notes are yet to be overwritten. If the notes are not yet overwritten, recovering them from your iPhone may be possible. To learn how to recover permanently deleted notes on iPhone, follow the steps below:
Step 1: Launch the data recovery tool on your computer. Using a USB cable, connect the iOS device to your computer.
Step 2: To recover your lost data, you will need to scan the iDevice. Select “Recover from iOS device” and then tap the Start button to initiate the scanning. The scanning time will depend on the amount of data currently available on the iPhone or iPad.
Step 3: After the scan, the data recovery tool will list all your lost data. On the left-hand column, you can select the data you wish to recover. If your goal is to recover only the Notes, tick the Notes checkbox only. You can preview the notes and select the ones you would like to get back.
Step 4: Next, tap Recover. The tool will prompt you to “Recover To Computer”. Tap the button and then select the location where you wish to store the recovered notes.
Note: SynciOS Data Transfer saves the recovered notes as an HTML file.
4. Recover Deleted Notes on iPhone Using iCloud Backup
If you had already enabled iCloud automatic backup on your iPad or iPhone, you may be able to recover lost notes on iPhone from the recent iCloud backups. It is important to note that you will have to restore everything available in the backup onto your iPad or iPhone. This means that you will end up losing all the new data you had generated on your iDevice since the backup was created. Before restoring the iCloud backup, it is always a great idea that you confirm that the backup file you intend to use is up-to-date.
To learn how to recover notes from iCloud, follow the steps outlined below:
Step 1: On your iDevice, Launch Settings > tap [Your Name] > iCloud > iCloud Backup. Check the last backup date. This may help you determine whether the backup file contains your lost notes or note.
Step 2: If you are sure that the backup file contains the Notes you want to restore on your iPhone, reset your iPhone by visiting Settings > tap General > Reset > Erase All Content and Settings.
Step 3: When setting up your iPhone/iPad, choose Restore from iCloud Backup.
Step 4: Using your Apple ID and password, log into iCloud. This should give you access to the list of backup files you have on iCloud.
Step 5: Select the most recent file and begin the restoration process.
Extra Tips: How to Better Manage Your iPhone Notes
Now that you already know how to recover deleted notes on iPhone, let’s see how you can make the most out of your notes.
Tip 1: Save Your New Notes on iCloud
If you are not saving your notes on iCloud, even with a guide on how to recover notes from iCloud, you won’t be able to recover notes from iCloud. Before you create new notes, confirm that the Notes app is synced with iCloud. To do this, follow the steps below:
Step 1: Visit Settings and tap iCloud.
Step 2: Toggle on Notes.
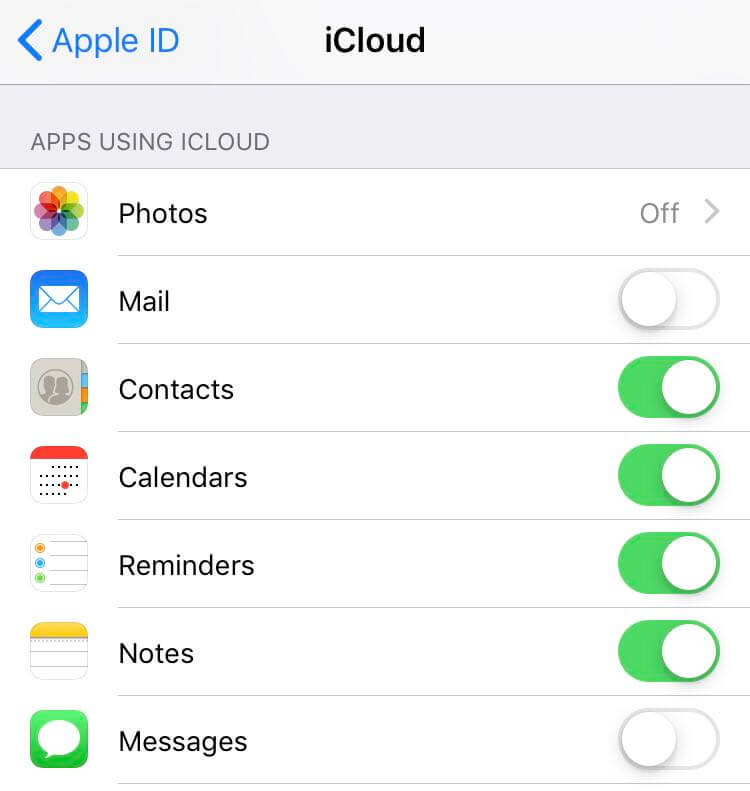
Now, whenever you create a new note, it will be immediately uploaded to iCloud.
Tip 2: Move the Currently available Notes to iCloud
If you already have existing notes, you can make things easier for you when you need to recover notes on iPhone by moving the notes to iCloud. To move your notes to iCloud, follow the steps below:
Step 1: Launch the Notes application and click Edit.
Step 2: Select the notes you wish to move to iCloud and then tap Move to. Select ICLOUD under “Select a folder”.
Tip 3: How to Add Web Pages to Your Notes
Similar to Evernote, adding webpages to the notes you create in the Notes app is possible. To do this, follow the steps below:
Step 1: When on a webpage, simply click the share icon and then tap Notes.
Step 2: Choose either to add the webpage to an existing note or a new one.
Tip 4: Lock the Notes
If you have crucial data on the Notes app, you can lock these notes. To do this, follow the steps below:
Step 1: Open the note you wish to lock and click the share icon.
Step 2: Tap the Lock option. Lock the note using either the Touch ID or passcode.
Tip 5: Move Notes Between the Folders
This is actually very easy. The steps below should show you how:
Step 1: Access the notes on your Mac, iCloud’s website, or your iOS device.
Step 2: Drag and drop the notes from one folder to another.
Tip 6: Keeping the Notes Organized
Syncing your notes across more than email account can be confusing. To stay organized, you need to understand where you have saved your notes. If you use Siri to create notes, you can simply set the default notes account by visiting Settings > Notes.
If you create notes manually, it is always a great idea that you know which account you will be using when creating the new notes in the app. By tapping the back-arrow present on the top left-hand column, you can select the folder where you want to save your notes.
Summary
If you have been asking yourself the question, “can you recover deleted notes on iPhone?” you will be pleased to learn that this is actually possible. This article shows you how to recover notes on iPhone. We have shown you the top solutions which have been working for iDevice users over the years. It is crucial to note that the best method you can use is a data recovery tool. We have already shown you how to recover deleted notes on iPhone 6 using a data recovery tool. When compared to other options, the data recovery tool has a higher success rate.
You may also want to read: iOS Data Recovery