Every firmware continuously rolls out updates to improve functionality and fix existing bugs, and so do Apple devices.
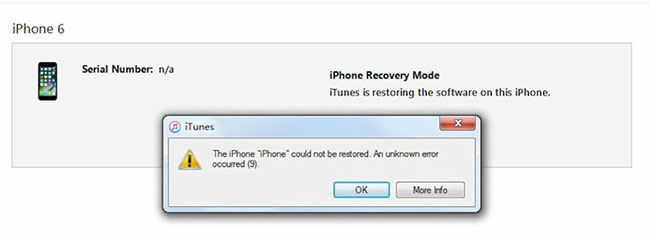
However, you might sometimes get an iTunes error 9 when updating your iOS device using your PC’s iTunes.
Remember, every update or restoration in iTunes generates a log file on your PC but often leads to errors when broken or interrupted.
Therefore, this article offers insight into fixing the iTunes error 9 pretty seamlessly.
Why Does iTunes Error 9 Happen?
It’s typical to think that wireless connections play a part in iPhone error 9 messages, but hardware issues are usually the main precursors.
They range from a compromised Anti-Rollback EEPROM to unviable or interrupted USB connections amidst an update process. This problem can also be apparent when a chip fails to communicate with the rest due to physical damage, or you’ve jailbroken your iOS gadget.
While all these causes explain the issue’s genesis, none of them can be as subtle as your firewall blocking communication between your device and servers.
So, here’s how you fix the iTunes error 9.
How to Fix the iTunes Error 9
Fixing the iTunes error 9 can feel daunting, especially if it keeps recurring.
Sometimes, it creates carnage on your phone, compromising data or erasing it altogether.
However, there’s always a solution for virtually any software problem, and fixing the iTunes error 9 is just as easy. Suppose your phone or other iOS device puts you on this rough patch.
Here’s how you can deal with it.
1. Use Proficient Software to Solve Itunes Error 9
The glad tiding is that you can fix this error without losing any crucial data, and professional software help you out without raising a finger.
StarzSoft Fixcon is one of the most versatile and helpful software dealing with most iOS errors without wiping off your data.
It’s your one-stop solution to any hardware and software problem and a whiz for nagging error codes.
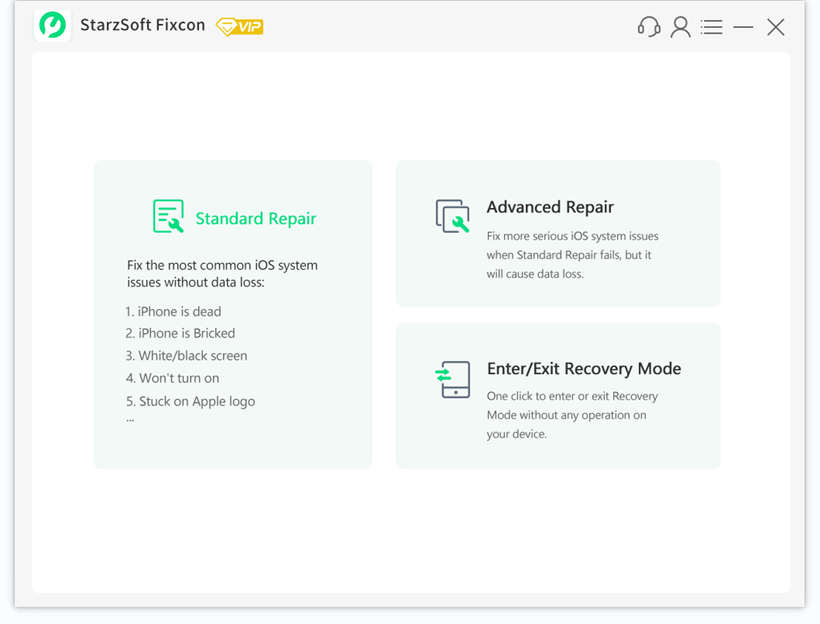
Regardless, you still have other options to run to, but the issue is that most software hardly delivers on their promise and might leave you bent out of shape.
Your software choice determines whether or not this process would be a breeze, but while that counts, StarzSoft Fixcon makes the process a walk in the park.
2. Force-Restart Your Ios Device
Sometimes, restarting your iOS device can be the remedy for the iTunes error 9. It starts every process, refreshing your system and eradicating this nagging error.
Apple is for the idea of restarting your device when you hit a dead end and can’t forge ahead. However, the best way to refresh your phone is to force-restart it, which is marginally different for most iOS devices.
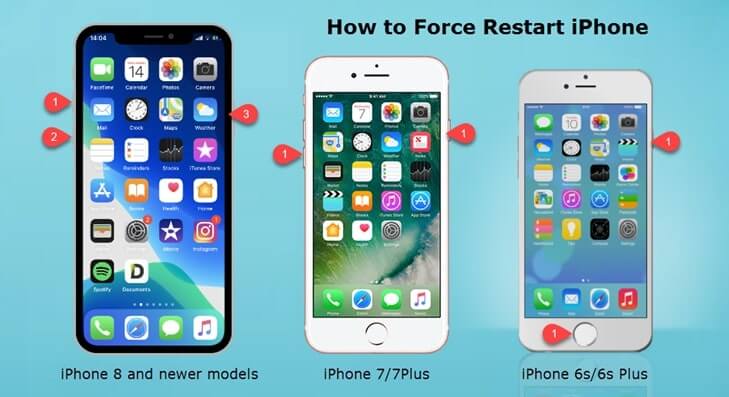
The procedure is also cross-cutting to most devices, mainly involving pressing and quickly releasing the volume up button and doing the same for the volume down button.
Afterward, you can press and hold the side button until the Apple logo appears.
3. Check Your USB Port and Cable
You may run around trying to solve the iTunes error 9 in vain while only your USB connection needs the effort. Most updates fail because of a faulty USB connection or an unviable USB port.
And since your update process needs to access the log files to be successful, it becomes overly far-fetched.

Sometimes, the nagging problem could be as simple as your USB connection is somewhat loose, and readjusting could do it.
Therefore, before updating your iOS device using your computer, please check for loose or faulty connections.
If that fails to work, you can use a different USB cable or switch to the original that came with your phone to ascertain compatibility.
4. Install the Latest iTunes Version
An old and obsolete iTunes version can sometimes be why you encounter the nagging iTunes error 9.
If that’s the case, then fixing it is quite a breeze. You only need to update your iTunes to the latest version, and it’s all fixed. Launch it on your PC to update your iTunes and head over to the menu bar.

Hover over to the “Help” button and click “Check for updates” before following the instructions and fixing the problem.
Once you install the updates, please restart your PC, and you’ll find the iTunes error 9 fixed.
5. Check Your Computer’s Firewall and Antivirus
Your computer must forge a complete and uninterrupted connection to iTunes and Apple servers.
However, your firewalls and antivirus settings could hinder that, leading to the iTunes error 9. Most updates and restorations prompt you to check your firewall or antivirus and whether or not they allow the process.
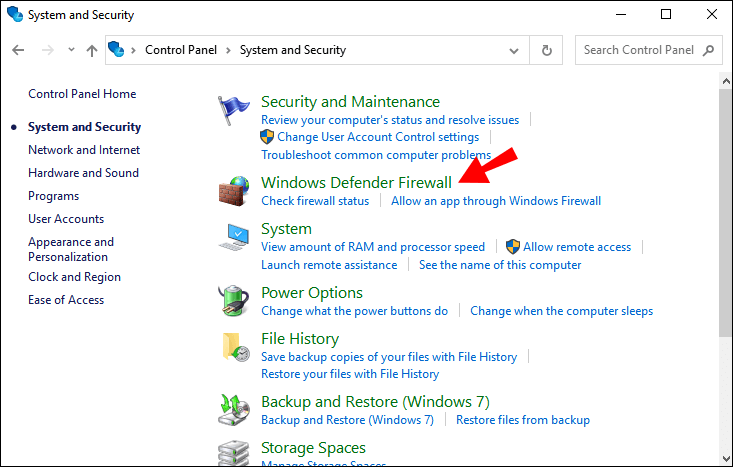
Sometimes, you may have to shut them down temporarily, although that can be risky.
Whatever way seems feasible to you, rest assured that it’ll fix the error code if your security software and functionalities are the problems.
6. Update Your iPhone Without Rigid Connections
If the error code is persistent, you could ditch your USB and update your iPhone wirelessly.
This quick fix is more viable if your USB is faulty or the connection is loose and keeps interrupting the update process.
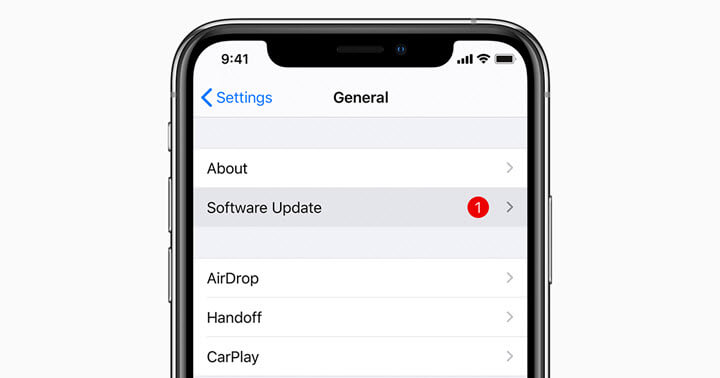
However, you must be sure of an uninterrupted internet connection to avoid triggering the error code. This process is pretty intuitive, and given the simple iPhone interface, you should be able to find the software update button.
Click under settings, move to General, and update your phone by tapping, downloading, and later installing it.
7. Use the Recovery Mode
Before using the recovery mode to fix iTunes error 9, here’s a checkpoint: back up every data on external storage or in the iCloud.
![]()
As such, it should only be your last option since it can potentially wipe out every single data stored on your device. The process is also intuitive and should be an easy fix for the error.
Conclusion
Finding the cause for iTunes error 9 can be some leg work if you aren’t well-versed with dealing with error issues.
However, once you establish the genesis of this problem, fixing it using either of the methods above should be a piece of cake.
If you’re insecure about losing your data, you can still back it up in an external storage device before proceeding. Hopefully, this information will help fix the headache, so break a leg!