
Whether you want to change your Apple ID country or region because you are traveling or you want to simply use a fake GPS location on your iPhone, this is doable. While changing the Apple ID country or region is easy, spoofing the GPS location is not as easy. In this article, however, we will be showing you how to change location on iPhone, both via the normal way and via spoofing.
Part 1: How to Change Your Apple ID Region or Country?
If you happen to move to a new country or region, you may want to change the Apple ID country. Changing the Apple ID region will change the billing address for all the Apple services you use with the same Apple ID. In this section, we will be showing you how to change location on iPhone for the Apple ID.
Before You Change Location on iPhone for the Apple ID, Do the Following:
- If you have any store credit on the Apple ID, spend it. Also, you have to wait for the pending store credit refunds to finish processing.
- Cancel subscriptions, including Apple Music. Also, allow for the subscription period to end before changing the Apple ID region or country.
- Wait for memberships, iTunes Movie rentals, seasonal passes, and pre-orders to complete.
- Ensure you have a payment method for the new region or country ready.
- Create a backup for your iDevices via iTunes.
How to Change Location on iPhone/iPod Touch/iPad for Apple ID
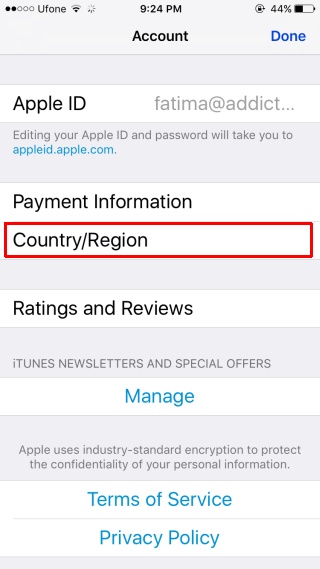
Step 1: Open Settings > [your name] > iTunes & App Store.
Step 2: Click the Apple ID > View Apple ID. You may have to Sign in.
Step 3: Click Country/Region and then click Change Country or Region.
Step 4: After tapping the new country or region, be sure to review the Terms & Conditions.
Step 5: On the top-right corner, hit Agree and then click Agree again to confirm.
Step 6: Select a preferred payment option and then enter the new payment option and the billing address. Click Next.
How to Change Location on Mac or PC for Apple ID
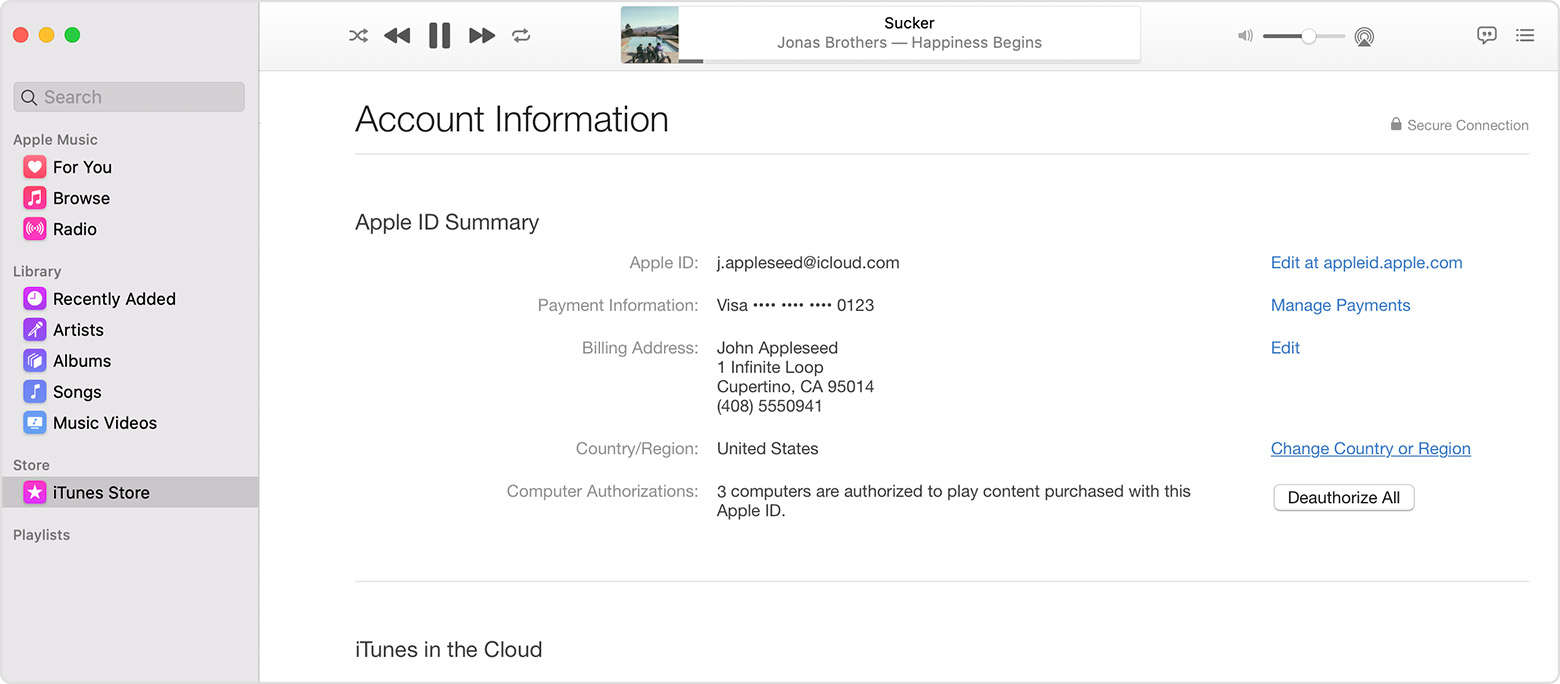
Step 1: Launch iTunes.
Step 2: From the Menu bar available at the top of the screen, select Account > View My Account.
Step 3: Use your Apple ID to sign in and then tap View Account.
Step 4: On your Account Information page, tap Change Country or Region.
Step 5: Choose your new region or country by tapping “Select a country or region” menu.
Step 6: After reviewing the terms and conditions, hit Agree. Tap Agree again to confirm.
Step 7: After entering your new payment data and billing address, hit Continue.
How to Change Location on Your Apple ID Account Page
Step 1: Visit https://appleid.apple.com/ and sign in.
Step 2: Locate the Account section and then tap Edit.
Step 3: Select the region or country by tapping the Country/Region Menu.
Step 4: Tap Continue to Update when the page prompts for confirmation.
Step 5: Enter the new payment data and the billing address. Tap Save.
Part 2: How to Change Location Settings on iPhone via Spoofing the GPS Location?
Why You Would Want to Fake Your Current Location
Faking the GPS location may appear weird considering that a large number of iPhone users use the GPS for tasks which require the true location. Examples of such tasks include weather updates and finding directions. There are, however, legitimate reasons why you would want to change the iPhone location to a fake one. These reasons include the ones indicated below:
When Using a Dating App
If you are planning on moving to a new location soon, spoofing the GPS location to lie to the dating app could help you get ahead in your dating game. The dating app will think that you are already in the area where you will be moving soon and hence provide matches based on your future location.
When Playing a Location-Based Game
If you are playing a location-based game, such as Pokemon GO, you may not want to travel a couple of miles to pick up a different Pokemon type. In this case, you can trick the iPhone into making the Pokemon GO believe that you have already traveled the extra miles.
Additional reasons why you may want to change location on iPhone include:
- Tricking your friends on Facebook into thinking that you are currently on vacation.
- Fool friends on the location sharing app.
Issues with GPS Spoofing
While knowing how to change location on iPhone via GPS spoofing can be fun, it has some issues. The first issue you need to be aware of is that GPS spoofing is a little bit complicated. This is because the spoofing is not a built-in option. The GPS spoofing may not work for all the apps you have on your iPhone.
If you are using a Fake GPS location application on your iPhone, the application may affect other functionalities. For example, if you try to find directions while the app is still enabled, you may end up getting the wrong directions.
Some applications, including Pokemon GO, are capable of detecting when the location is being spoofed. If apps which rely heavily on the right location figure that you are spoofing the GPS location, your account may be suspended.
Best Ways to Change Location on iPhone
Use a Computer Program
The easiest way to change location on iPhone is by installing a program known as iTools from ThinkSky on your computer. This tool lets you pick any location to trick your iPhone applications into thinking that you are in the selected location. Even after you disconnect your iPhone from iTools, this method will still work.
You won’t need to jailbreak your iPhone to change location on iPhone using iTools from ThinkSky. The tool will generate the required results on iPhones running iOS 12 and earlier. To learn how to change location settings on iPhone using iTools from ThinkSky, follow the steps below:
Step 1: Install the tool on your computer. Connect your iPhone to the computer using a USB cable.
Step 2: Tap Home to go to the Home screen.
Step 3: Click Virtual Location on the Home screen.
Step 4: On the text box that appears, enter the fake location and then hit Enter.
Step 5: When the marker lands on the map available on your iTools screen, click the Move here to take the iPhone to the entered location.
If the marker is not correct, you can click anywhere on the map to change the iPhone location to the clicked location.
Step 6: You can go ahead and exit the Virtual Location screen in the program. You can also close the program itself. If asked whether you would like to end the simulation, choose No to ensure that the fake GPS location stays even after you unplug your iPhone.
To end the location simulation, return to the Virtual Location and then click on Stop Simulation. Also, rebooting the iPhone can help end the location simulation.
Edit the PLIST File
This is another ideal way you can use to change location on iPhone without jailbreaking the device. This method, however, will only help you change location on iPhone running iOS 10 and earlier. To learn how to change location on iPhone, follow the steps we have below:
On Windows PC
Step 1: Install 3uTools on your computer. To install the tool visit http://www.3u.com/.
Step 2: Ensure that iTunes is closed before launching 3uTools.
Step 3: Connect your iPhone to the PC using your USB cable and wait for 3uTools to recognize the iPhone.
Step 4: At the top, open the iDevice menu. Select Back up/Restore at the bottom of the screen and then tap the Back up iDevice option.
Step 5: When asked where to save the backup, select a location you can recall or simply leave the backup in the default location.
Step 6: Tap Back up Now to initiate the backup process.
Step 7: When the backup process finishes, you should see the “Backup succeeded message”. Hit the Ok button. Next, exit the Back up iDevice window. This will take you to the Backup/Restore screen.
Step 8: Select the Backups Management option.
Step 9: Choose the backup you have just created. You should find it at the top of the list of backups.
Step 10: To launch the backup in the Backup Viewer tool, select View.
Step 11: On the left, pick the App Document tab. Next, open the AppDomain-com.apple.Maps folder which should be available on the right-hand side.
Step 12: Open Library > Preferences and then double-click the com.apple.Maps.plist file.
Step 13: Scroll to the bottom of the text file. Copy and paste the text below directly above the last </dict> tag.
<key>__internal__PlaceCardLocationSimulation</key>
Step 14: Directly below the above line, make the next line reads:
<true/>
Make sure that a proper tag alignment exists before proceeding to the next step.
Step 15: Using the Save button available at the top of the Editor, save the file. After saving the file, click OK.
Step 16: Exit plist Editor, the Backup Viewer, and the Backups Management screens.
Step 17: Select Restore Data on the Backup/Restore screen. After selecting the most recent backup (the one you edited), select Restore Now.
Before restoring the backup, it is often necessary to turn the Find My iPhone feature off. To do this, visit Settings > iCloud > Find My iPhone and toggle the feature off.
Step 18: Unplug the iPhone after the Restore and open the Maps application and then search the fake location you would like to use.
You need to open Apple’s Maps application and not Google Maps or a different navigation application.
Step 19: When the pin appears on the map, scroll the menu at the bottom and then click Simulate Location.
On Mac
Step 1: Install iBackupBot on your Mac after downloading it via this link: https://www.icopybot.com/itunes-backup-manager.htm
Step 2: After the installation, leave iBackupBot closed and launch iTunes.
Step 3: Connect your iPhone to your Mac using a USB cable and click its icon when it appears on iTunes.
Step 4: Select the Manually backup and Restore section.
Step 5: After confirming that the Encrypt iPhone option is no selected, tap Back Up Now.
Step 6: Wait for the backup process to end.
Step 7: Close iTunes and then launch iBackupBot.
Step 8: The tool should open your latest backup.
Step 9: Locate the Apple Maps plist file and open it. Check the com.Apple.Maps.Plist file in one of the following locations:
- System Files > HomeDomain > Library > Preferences
- User App files > com.Apple.Maps > Library > Preferences
Step 10: After opening the com.Apple.Maps.Plist file, look for the <dict> tag and paste the code below under the <dict> tag:
<key>__internal__PlaceCardLocationSimulation</key>
<true/>
Step 11: Save the file and close iBackupBot.
Step 12: Without disconnecting your iPhone from the Mac, Toggle off Find My iPhone by visiting Settings > iCloud > Find My iPhone.
Step 13: Launch iTunes and then restore the recent backup. Pick the backup you have just edited.
Step 14: Open Apple Maps application and then find the location you wish to spoof. When you tap at the bottom to see the location information, you should see a Simulate Location button. Click on it. This should spoof the location even after you disconnect the iPhone from the Mac.
Restarting the iPhone will take you back to using your actual location.
Using a Jailbreak Tweak
If you have jailbroken your iPhone, you can use a jailbreak tweak known as Anywhere! to change location on iPhone. To learn how to change location settings on iPhone using the jailbreak tweak, follow the steps below:
Step 1: Install the Anywhere! app by following this link: http://cydia.saurik.com/package/net.85819.ios.otrlocation/
The app is in Chinese. However, you can still use it easily.
Step 2: Launch the app and then navigate to the fake location you would like to use.
Step 3: Tap the location and a red pin should appear.
Step 4: Click the blue tab on the next screen and select the application you wish to spoof the selected location in.
Step 5: Click the top-right corner where 2 words appear.
Step 6: Now, your selected apps should be using a fake location.
Summary
If you are new to changing the location on your iPhone, it might appear complicated at first. However, after following the steps outlined above, the whole process should become easy. When compared to spoofing the GPS location, changing the Apple ID location after moving to a different region or country is much easier. It is important to note that some of the methods outlined above may not work for newer iOS versions.