AirDrop is an awesome feature available on every iPhone, iPad, and Mac device. This is an ad-hoc service allowing users to transfer files easily between any iOS or Mac device. With this service, you can instantly send pictures, movies, documents, and whatever file you want to the other users or your own Mac device.
However, despite the convenience offered by the AirDrop service, it is difficult to figure out the working, especially for first-time user. The thing that stumps most users of the service is being on the receiving end.
They wonder where do AirDrop files go on Mac? Are they saved in the same place as the rest of the files received or located elsewhere? If you do not know where to look for, it can be difficult to find the AirDropped files.
If this is the current dilemma you find yourself in, you have come to the right place. Here, in this blog post, we will show you exactly where AirDrop files go on your Mac device. Let us look at that, but before, let us know a few things about AirDrop.
What is AirDrop?
Apple offers its users various enhanced features to make their experience with iOS and Mac devices better. Among all the features offered, one is the AirDrop. AirDrop is a cool feature in all iOS and Mac devices that enables users to transfer files, photos, movies, and other content instantly and securely to other iOS and Mac devices within close proximity.
The feature also allows you to send contact information, locations pinned on Apple maps, playlists, websites, and more. AirDrop uses Bluetooth technology to locate nearby AirDrop-enabled devices creating a peer-to-peer Wi-Fi network connection.
This creates a firewall to transfer files securely. This transfer does not use the Internet, but you need to keep the Wi-Fi and Bluetooth turned on, on the device.
Also, there is no limit to the file size you can transfer. As file transfer is not over a network, you do not share bandwidth with anyone.
How to Use AirDrop on Mac?
AirDrop offers the simplest and easiest way to transfer files from one Apple device to another. To use the AirDrop feature, both the devices (transfer and received devices) should have Bluetooth and Wi-Fi turned on, and the devices should not be acting as a personal hotspot.
On Mac device, there are two ways to use AirDrop.
First Method
Step 1 – Go to AirDrop
Tap on Finder and then choose Go > AirDrop. Alternatively, you can press the Alt + Shift + R keys. A window pops up showing devices available to receive files. Here, ensure that devices are awake to display. If the display is off, the file transfer will not work.
Step 2 – Select the File
Choose the file or files you want to transfer and drag them onto one of the contacts to share them. The other device will get a notification saying, for instance, “Tony” wants to send you “Files.zip” with three options Accept & Open, Decline, and Accept.
Second Method
Another way to transfer files through AirDrop is to use Sharing menu.
First, select the file you want to send and then right-click on it. Now, choose Share > AirDrop, this opens a dialog box asking you which device you want to transfer the file. Just click on the device name and your file will be transferred. It is that easy.

These are the two methods you can use on your Mac device to send files.
Now, when you receive files on your Mac, you accept them, but do not where they go, then read on.
Where Do AirDrop Files Go on Mac
The answer to where do airdrop files go on mac question is simple. When you AirDrop files from iPhone, iPad or if someone sends the files to your Mac, they will be saved automatically in the Downloads folder.
The Downloads folder is located by navigating through Finder > Go > Downloads, or through the Dock. Once you find the Downloads folder, you will see all the files like photos, movies, PDFs, word documents, presentations, and images, sent to you via AirDrop.
However, there is a shortcut as well to get to Downloads folder. Just open the Finder and click Options + Command + L. It will navigate you quickly to the Downloads folder to find all the AirDrop files.

So, next time when someone sends files to your Mac device using AirDrop, you know where to look for them. Straightaway checks the Downloads folder to find the files. There are various ways to access the Downloads folder, but the quickest methods are the ones mentioned above.
Also, it is essential to note that if you receive a file through AirDrop from a device that shares the same Apple ID, you do not get the option to Accept or Decline. The files will automatically appear on the receiving Mac device.
Well, now that we have answered where do AirDrop files go on Mac, what else is there you should know. If you find that your Mac is not discovered by other devices, check the Bluetooth is turned on. If not, then do so by clicking on its icon in the top right-hand corner of your screen.
In addition to this, make sure that if the device is not in your contacts list yet, you set your Mac’s AirDrop to be discoverable by everyone. You can change discoverability settings anytime.
How to Adjust AirDrop Settings on Mac?
Step 1 – Open the Finder on your Mac.
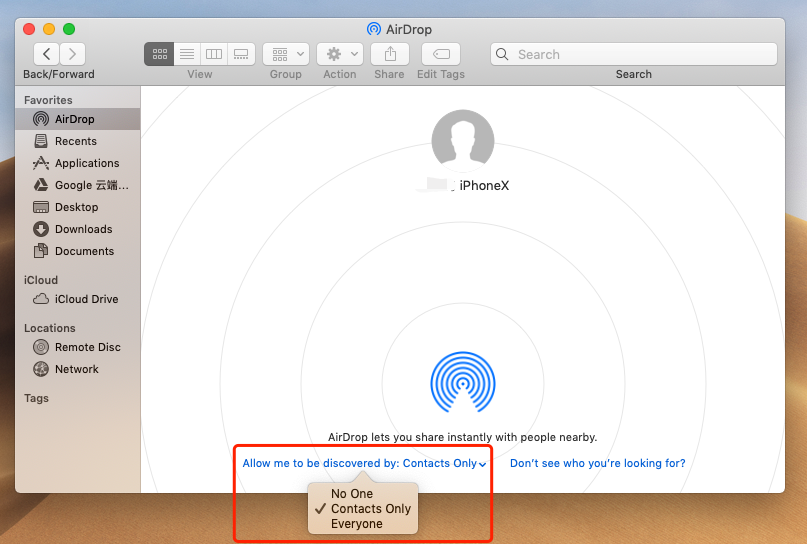
Step 2 – Choose AirDrop from the sidebar in Finder. If AirDrop is not listed, press the Alt + Shift + R keys to open it.
Step 3 – Click on the dialog Allow me to be discovered by, a drop-down menu appears with the options as Contacts Only, Everyone, and No one. Select Everyone or your Contacts Only as you prefer to allow them to discover your device when AirDropping files.
Now that you know how to use AirDrop and where to find received files on your Mac, start using to take advantage of this fantastic feature.