Being stuck somewhere, isn’t it bad to experience it again and again? A blank page in your Word document is always troublesome from time to time. The blank page does not look great either in the middle or at the end of your document. It seems to be stuck and not deleted after so many attempts. Yes, it is quite frustrating!
Microsoft Word’s unwanted blank pages are usually caused by extra paragraphs or page breaks, section breaks, a table, etc. You can skip the blank page while printing, but that’s not the perfect solution. You need a proper way to remove the blank page to avoid further inconvenience. By eliminating all of the unseen format signs, you can solve the issue.
Now go ahead and open the “WORD DOCUMENT.” Hopefully, you will not face any problems. However, if you encounter a problem, here are some possible steps to delete your unwanted blank page in Word.
All the fixes mentioned in this article or guide may not work for everyone. You will likely face problems while applying any of the fixes. Don’t lose hope and try another one. A fix may work for someone else but not for you. So, try these fixes one by one and get your job done.
Basic Way to Remove Blank Pages in Word
step 1: Go to the unwanted blank tab, click as close as you can get to the end of the screen, and hit the backspace key before the page is deleted.
Step 2: Go to the VIEW tab, select the navigation bar in the Preview column, select the blank thumbnail of the page in the left pane, and press the delete key until it is removed.
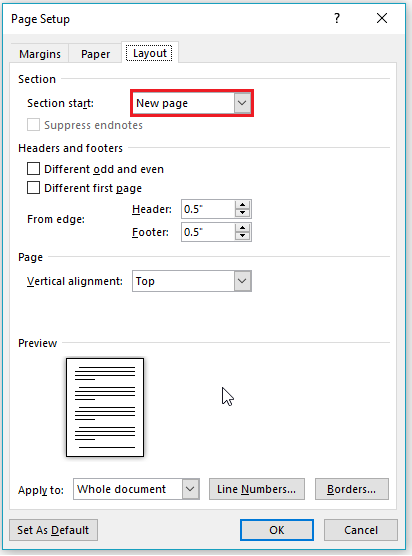
Step 3: Go to the PAGE LAYOUT tab, click the Margins button, and select Custom Margins. Click on the Layout tab. Make sure that the new page is selected in the drop-down menu next to Section start. Now, click OK.
Removing Unwanted Page Breaks
You can also see that a page break was placed into the text during word document work while you have the Show / Hide characters turned on. It is easy to build a page break. You can position the insertion point on a new page anywhere you want to start and click the Page Break button on the Insert key.
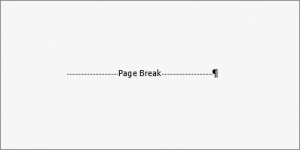
It inserts a mark for a page break. So what you need to do is remove the icon, and the page break will be removed, and the text will be reassembled. You need to delete unnecessary page breaks to get rid of those extra pages.
Checking the Pagination Settings
Check the pagination settings if you have a huge gap, and you can’t see any paragraph markers or page-break symbols.
After that, click on the one after the massive gap at the top of the next page.
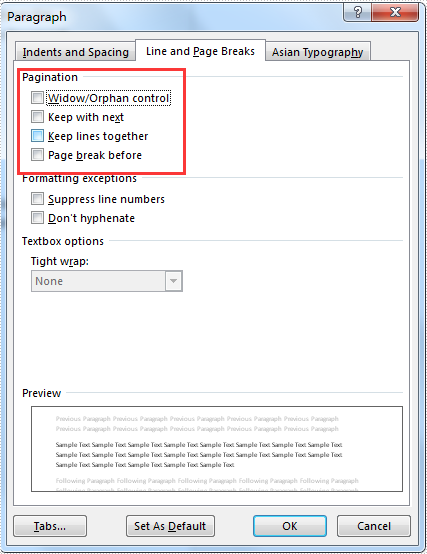
Right-click the paragraph and click on the Paragraph button. Tab on the Line and Page Breaks tab while the Paragraph dialogue box opens.
Delete the checkmark from the Page Break before the option box, and then press OK.
You should have fixed the big gap now, and the sections are going to be back together again.
Removing a Segment Break (The Safe Way)
Segment breaks can cause extra pages in your document. However, you need to be patient before deleting them. You will delete any headers and footers you have in the previous section if you delete a segment break.
Segments break ‘pages’ of the text so that in separate sections, you can have different page formats. You may, for example, have a header and a page number in section 1. You can turn these off in section 2.
Deleting the segment break between tab 1 and tab 2 would only add the section 2 header and footer configurations, deleting the formats of section 1. Your header and page numbering will disappear. So, continue carefully.
What you need to do before eliminating the section break is go to the section 2 header, footer, or page number settings and press the Link to the Previous button to link them from section 1. It will then move to section 2 with the same formatting parameters.
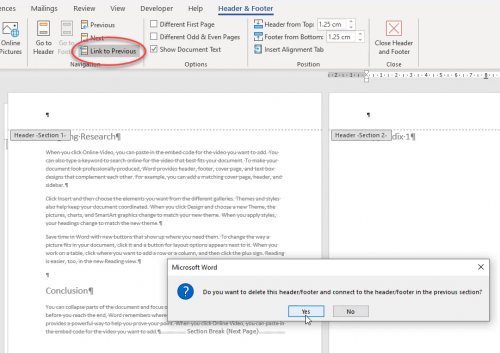
Now you should be able to see the Segment Break button for your Show / Hide characters on it. Only choose it and, to uninstall it, click DELETE. Now the additional page is gone, and the headers and footers should still be all right.
Removing a Blank Last Page in Word Doc
Try this if you have a blank page at the end of your document that doesn’t get removed when you click the paragraph symbol and hit delete. Turn on your Display / Hide characters from the Home tab and then go to the second to last page of your file.
If you see an icon for page breaks, click it and remove it. If several paragraph symbols with blank paragraphs are available, pick them and delete them. You seem to have deleted the last blank page now.
Convert Word to PDF to Delete Blank Pages in Word
You can get rid of an empty blank page by saving the document as a PDF, leaving out the last page.
Go to File, click on Save As, choose a place where you want to save the file, and then choose PDF as the ‘Save as’ type.
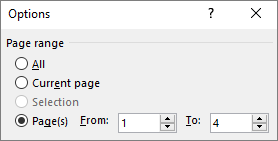
In the Save As dialog box, Click on “Options”.
Under the range of page options, select Page(s), and then mention your non-blank pages. For instance, if page 5 of your file is the blank page, you can’t get rid of this issue by specifying pages from 1 to 4.
Note: You can convert your document to PDF form by PDF WIZ.
PDF WIZ converts your document type without having access to your document. All you do to convert your file type happened at your PC. In this way, PDF WIZ ensures security and privacy. You can get its subscription and convert your document in PDF and many other file types.
Go to Function (For Mac)
If you haven’t read the Windows 10 portion, then let’s do a short update. The ”Go To” function allows your pointer to move to a page, portion, or line you choose, rather than scrolling, as if you were teleporting the cursor to that position to save time.
‘Go-To’ not only moves the cursor to the tab you wish to remove but also helps you to display the content of the page and make it ready to be removed.
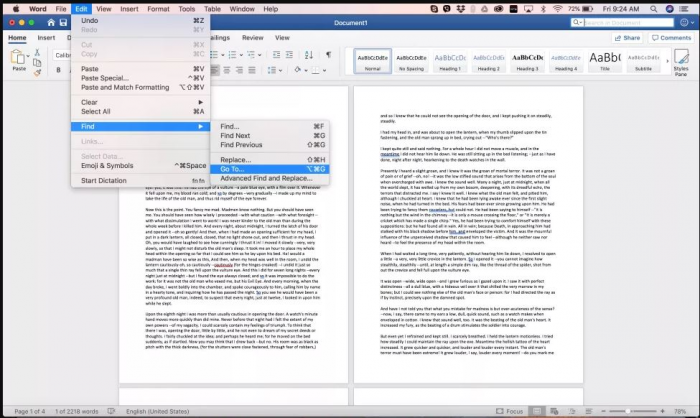
Step 1: On the Main Menu tab, go to Edit, then Find and select ‘Go-To.’ Alternatively, simply press Fn+Cmd+G. The ‘Go-To’ tab should be opened in the Find and Replace dialog box.
Step 2: In the Enter Page Number text window, type in the page number and press Go To. By typing in the relevant page, you will jump to the page you wish to remove. You can also type in + or- to jump from the current page to the one you are searching for if you don’t know the page number. For instance, if you’re on page 1 and the page you want to delete is down to four pages, just type +4.
Step 3: Then type ‘page’ and press Go To to outline the whole page. When the text has been outlined, press Close. In the Enter Page Number text window, type in the text ‘\page’ and press Go To to highlight the whole page you want to remove.
Step 4: To delete the page, click delete. Simply click the delete button after the whole page has been highlighted to remove the whole website in one move.
Removing a Blank Page at the End of a Table on Mac
Open Your Documents
In documents that end with tables, undeletable empty pages may occur. The location of the table allows Word to save the formatting data of the text in a blank paragraph just below the table. This paragraph cannot be removed, although it can be reduced to eliminate the blank page.
If you are using a Word template (e.g., resumes, maps, pamphlets), try this method, as these usually contain tables.
Navigate to the Tab for Table Tools
Click somewhere in the text right above the blank page if you don’t see the tab at the top of the browser, and it should appear.
On the Table Tools, Click on the “Layout” Tab
The table settings will be displayed in the top bar.
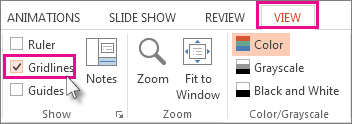
Select “View Gridlines”
The text should be surrounded by visible lines that are present before the unwanted blank page.
Enable Paragraph Marks
When you enable paragraph marking, it will display a bunch of paragraph symbols on your page. You can enable it by:
Windows: Ctrl+⇧ Shift+8
Mac: ⌘ Cmd+8
Select the ‘¶’ Symbol just below the Table
If there is more than one ¶, select them all by using your mouse.
Navigate to the Home Tab
The paragraph marker is selected; now, change its font size.
Click inside the Font Size Box
This box consists of a number (like 12). Also, it is beside the font names tab (like Roman).
Type 1 and press Enter
The hidden paragraph size will be reduced now, so it doesn’t require an entirely blank page. The blank page should disappear immediately after this step.
Turn off the Paragraph Marks
Now make those markers invisible again. Click on the ¶ icon or simply press:
Windows: Ctrl+⇧ Shift+8
Mac: ⌘ Cmd+8
Summary
When you try to delete an unwanted blank page but can’t do so, don’t lose hope. You will get through this issue in a few minutes. The main factors assembled as the causing factor of stuck blank pages are page breaks, pagination, section breaks, and blank page after inserting table, etc. We have discussed almost all the possible factors to resolve the blank page issue.
One of the easiest ways discussed here is to convert your document to PDF form and print a specific range of pages. For this purpose, you can use PDF WIZ to convert your word file to PDF. PDF WIZ offers flexible packaging for monthly basis subscriptions.
Another technique discussed is GO To function; this function supports Mac operating systems. Print Preview will still display blank spaces no matter what adjustments you make to the text. As far as blank pages are concerned, you have removed them effectively. So they won’t appear in printouts or PDF exports.
If you ever face blank pages in Word, we hope the fixes we have mentioned will help you solve your problem.