Microsoft released Windows 11 just a few months ago, a long time after the release of Windows 10.
While it took many years for the release to become public, it’s far from perfect and has had some issues following the launch.
As a result, updates are constantly being released for the operating system and this has led to users seeking ways to recover lost files after Windows 11 update.
In this article, we’ll be explaining the best Windows 11 data recovery solutions so that you have no problems getting back lost data.
Why Does Windows 11 Update Cause Lost Files?
The exact reasoning for users losing their files after a Windows 11 update is unknown.
In some cases, it can be because they fell several updates behind and so many changes were made that some data had to be removed for the installation to be successful. However, that’s not the only reason for this occurrence.
Another reason is that the user has mistaken a Windows 10 update for a Windows 11 installation, therefore the operating system is completely reinstalled.
Since Microsoft has offered this free upgrade to a lot of users, it’s an easy mistake to make. For this reason, you should always be careful about the Windows notifications that you receive.
The most likely explanation is that Windows 11 has not yet been perfected and that there are still a lot of bugs and adjustments that need to be made.
With updates coming very frequently, it’s no surprise that some users are experiencing data loss.
Are My Lost Files Gone Forever?
The important thing to be aware of is that if a Windows 11 update causes you to lose files, you aren’t without hope. There are ways that you can recover lost files after Windows 11 update and we’ll be getting into those shortly.
Your files are not gone forever. Due to the way that hard drives work, you have a window of opportunity before your files are unrecoverable.
After a file has been lost or deleted (for any reason, not just after a Windows update), it is still on your hard drive. The allocated storage for that file is only wiped if it is overwritten with new data.
So, if you notice data loss, use your computer as little as possible to prevent the file’s remnants from being overwritten and permanently lost!
Best Way to Recover Lost Files After Windows 11 Update
For best results, you should use the powerful data recovery tool known as StarzSoft Data Recovery.
It is known for being effective at recovering any type of data from any storage device at all, and it’s not as complex as many other tools out there.
- Suitable for recovering data from PCs, Macs, cameras, external hard drives, and SD cards
- Uses a deep-scanning algorithm to maximise the number of files it discovers and can recover
- Supports recovering any data type (over 1000 data formats are supported!)
- Incredibly easy to use without any data recovery experience
- Scan for files in a specific folder or scan an entire storage device
- A free trial is available!
These are just some of the features that you’ll get to experience when using StarzSoft Data Recovery and we encourage you to download the free trial now so that you can see how well the program works.
StarzSoft Data Recovery Step-by-Step Guide
Now that we’ve explained some of the features that this software has to offer its users, we’ll now be walking you through how to use it. Follow the steps below to recover any lost files on your PC.
Step #1 – Start by downloading StarzSoft Data Recovery and installing it on your PC. You can either purchase a license or take advantage of the free trial (either will work in this case).
Free DownloadSecure Download
Step #2 – Once you launch the software, the available storage devices will be shown. Select the hard drive that you want to scan, and the scan will begin soon after.

Note: if you want to save time and reduce the length of the scan, you can click on Select a folder and choose a specific location to scan.
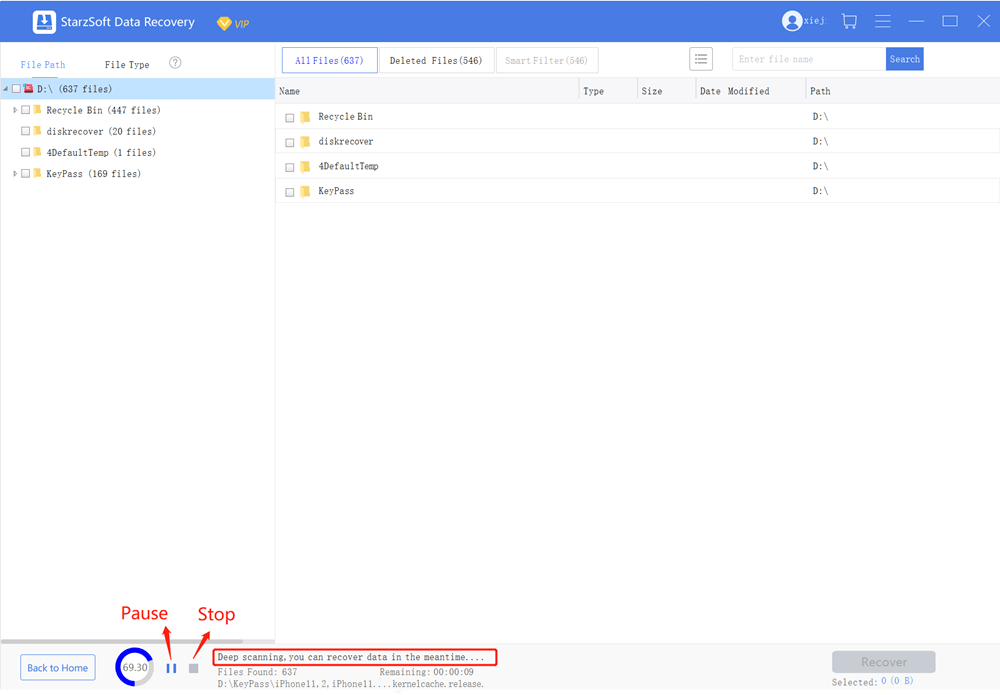
Step #3 – After a couple of minutes the scan results will begin to appear on your screen. You can browse the discovered files using the tree menu on the left sidebar, and you can click Pause or Stop to halt the scan at any time.
Step #4 – Navigate through the folders to locate the file you want to recover, then select it. If you want to recover an entire folder, simply check the box next to that folder.
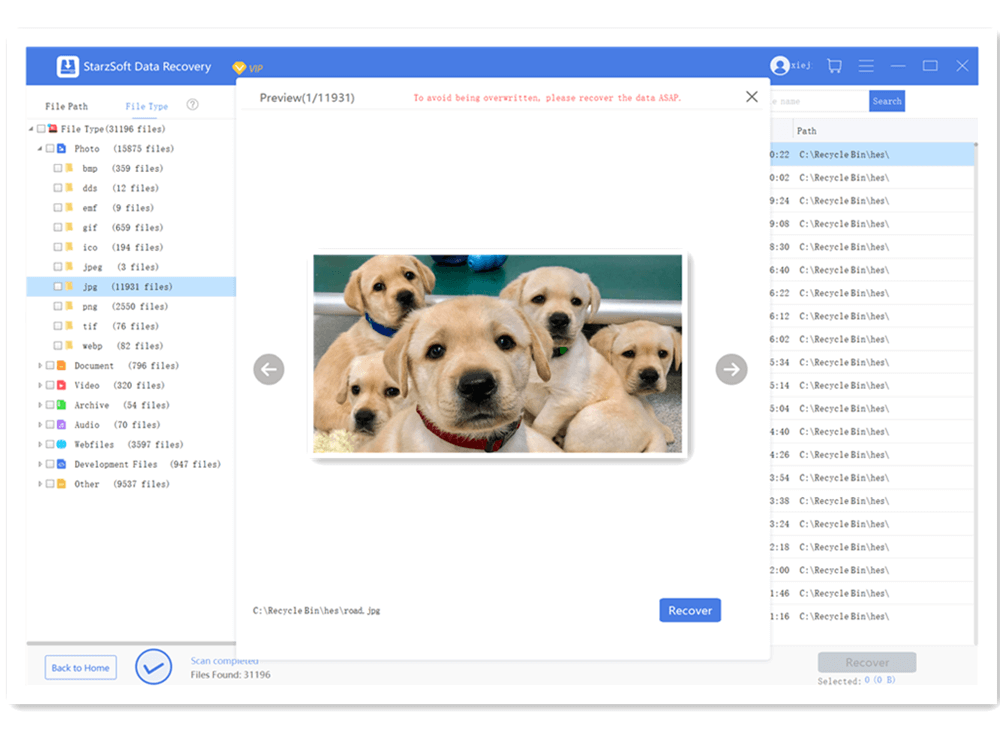
Step #5 – Lastly, click the Recover button at the bottom-right of the page and choose where you want the recovered files to be stored.

When you use StarzSoft Data Recovery, you won’t have to do much since the program handles most of it for you.
For the most part, you’ll be waiting for the scan to complete and even then, you are free to leave your computer while this happens (it can sometimes take hours to scan a large storage device!).
Other Ways to Recover Lost Files After Windows 11 Update
If you find yourself still unable to recover lost files after Windows 11 update then don’t worry. We’ve got a few other solutions that you can try out and hopefully restore your data.
1. Restore a Backup
Assuming that you’ve taken the proper steps and created a backup of your important files, it’s as simple as copying them back onto your computer.
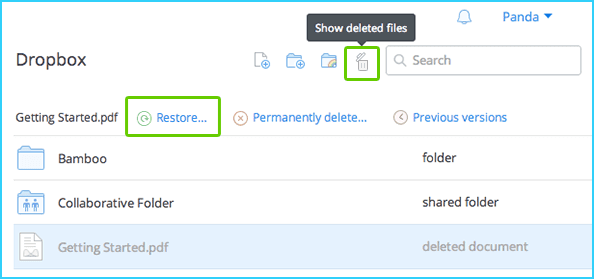
Popular cloud storage services like Google Drive, OneDrive, and Dropbox all offer a limited amount of free storage which enables you to access your files from any computer.
This is very beneficial since you aren’t relying on local storage so if your computer’s hard drive does corrupt, those backups are unaffected.
Alternatively, you can upgrade to a larger storage plan on either of these platforms or even invest in an external hard drive that has a much bigger capacity.
Now, if you’ve already got a cloud storage account set up, you can simply download the files you want to restore and you’re good to go. You can even use these services to sync the files so that no manual uploading is required.
2. Recover Files using “Backup and Restore”
Fortunately, Microsoft has implemented a feature for this exact scenario, and you may be able to restore your files with that feature. That feature is “Backup and Restore”, and here’s how you can use it.
Step #1 – Navigate to the Windows Control Panel and click System and Security.
Step #2 – From the list of options that are available, click on Backup and Restore (Windows 7).
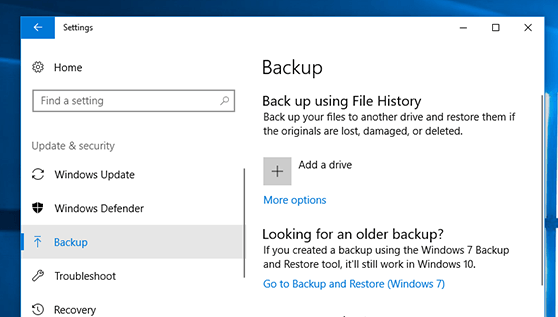
Step #3 – Any available backups will be shown here. If your backup isn’t listed, click Select another backup to restore files from and look for its location.
Even though this feature typically requires users to have taken a backup, there are some circumstances where a backup is taken automatically.
That being said, it depends on your system settings and most users forget to prepare their computers for automated backups.
3. Repair the Windows 11 Installation
When it comes to updating an operating system there are a lot of moving parts involved. This includes modifying existing system files and this may result in problems with file permissions.
A quick system repair should fix this issue.
Step #1 – Search for Command Prompt in the Windows search bar, right-click on the program, and click Run as Administrator. If you run the program normally then this method won’t work.
Step #2 – When the Command Prompt window appears, enter sfc /scannow and press the Enter key.
Step #3 – Wait a few minutes while the system scan is run. If the scan detects damaged or corrupt files, they will be redownloaded and fixed.
Step #4 – Next, type the command dism /online /cleanup-image /restorehealth.
Step #5 – This command will also run a scan which can take several minutes. If there is any corruption found, it will be resolved during this process.
Step #6 – Restart your computer after both these commands have been used.
If you’re worried about this compromising your computer and any files you have stored on it, don’t be! Although this is a complicated method to follow, it’s completely safe and there is little risk of the operating system corrupting or losing files.
Be aware that using the Command Prompt should be done with caution, though. Entering commands that you aren’t familiar with can be dangerous and may damage your computer, so make sure you fully understand the commands that you enter!
Conclusion
That’s all you need to know in order to recover lost files after Windows 11 update and with the knowledge you have gained from this guide, you should be able to recover your data without any further hassle.
We’d highly suggest trying StarzSoft Data Recovery as your first course of action due to its high success rate. Nonetheless, the other methods that we have introduced will also help you to get your files back.
Free DownloadSecure Download