Voice Memos make it possible for iDevice users to record conversations, music, or take a quick note of interesting ideas. Voice memos can fill up your device’s memory. When this happens, the best thing to do is get voice memos off iPhone.
Maybe voice memos have already filled up your iPhone. However, you have no idea how to download voice memo from iPhone. In this article, we will focus on showing you how to save voice memos from iPhone. Before we show you how to get voice memo from iPhone, let’s see what voice memos are.
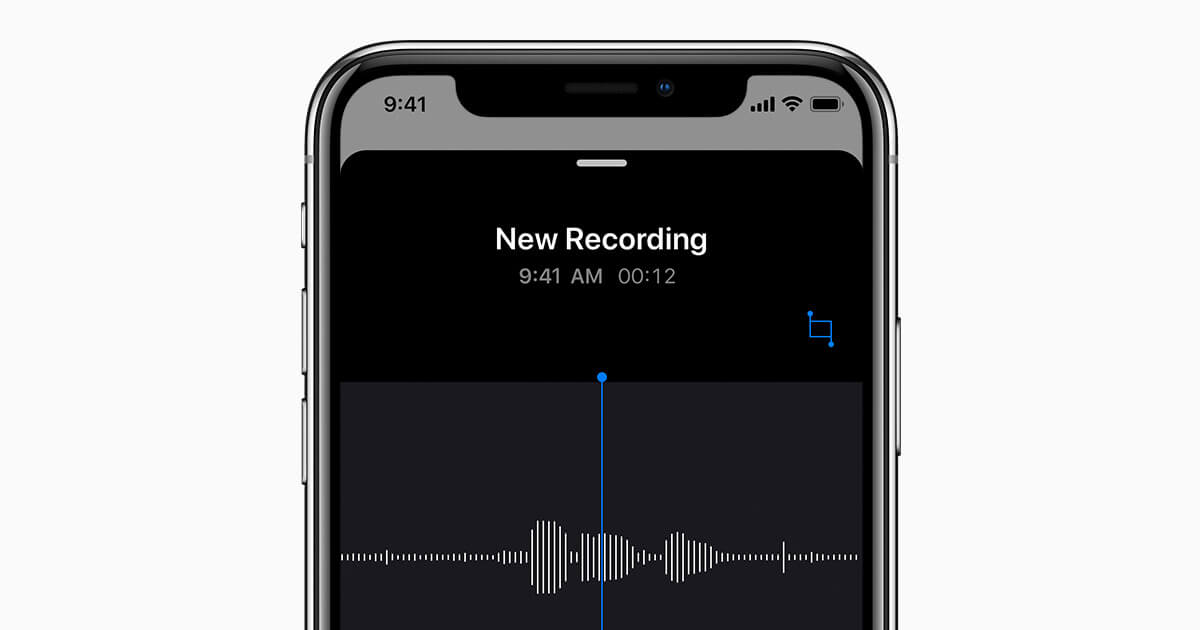
What Are Voice Memos on iPhone?
Voice Memos is a built-in feature available on iDevices. The feature utilizes the iDevice’s built-in microphone to record. You can use the Voice Memos to record anything from music to interesting conversations. While the built-in microphone will work just fine, if you intend to recorder higher-quality stereo, you may need to invest in an external stereo microphone.
Using Voice Memos is extremely easy. If you have never used the feature before, we have listed the basic steps you need to follow when using the feature:
Step 1: On your iDevice, launch Voice Memos manually or simply ask Siri to launch it.
Step 2: To start recording, you will only need to tap the red start button. You can pause the recording using the pause button. If you click the stop button, the feature will automatically save the recording with your current location as the title.
Step 3: When you finish recording, you will only need to click Done.
If you have used the same Apple ID to sign into iCloud on your different Apple devices, it is possible to have the memos you record on one device on other devices. All you will need to do is ensure that the Voice Memos option is turned on in iCloud.
How to Save Voice Memos from iPhone?
There are several methods you can use to get voice memos off iPhone. Below, we will focus on showing you how to download voice memo from iPhone using the top-rated methods.
1. Copy Voice Memos to Computer Using the Share Button
If you have a voice memo on your iPhone that you would like to get off your iPhone, you can use the share button and the email to transfer the voice memo to your computer. You will need to make sure that both your computer and iPhone are connected to the internet for this solution to work. To learn how to get voice memo from iPhone via the share button, follow the steps outlined below:
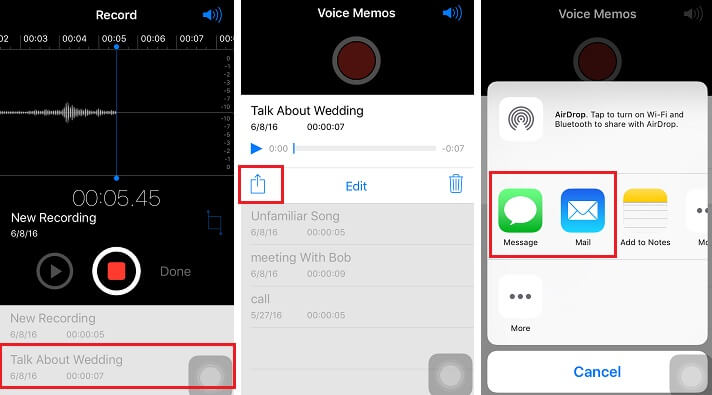
Step 1: On your iPhone or iPad, launch the Voice Memos app. Locate and click on the share icon.
Step 2: Various share options should appear. Select the Mail option.
Step 3: A new email window should appear on your iPhone. Type the email address you would like to use to send the voice memo to your computer. Next, tap Send.
Step 4: Fire up your computer and open the browser. Using the email address that you used when sending the voice memo, log into your email account. Locate the email that contains the voice memo you just sent. Download it to your computer.
2. Save Voice Memos to MacBook Using AirDrop
The AirDrop is an ideal solution you can use to get voice memos off iPhone. You can use AirDrop to transfer your voice memos from your iPhone to your Mac computer. When compared to other methods, this method is a little bit complicated. To learn how to save voice memos from iPhone using AirDrop, follow the steps we have outlined below:
Step 1: Enable both the Bluetooth and Wi-Fi on your PC and iPhone. AirDrop will not work if both are not enabled.
Step 2: Launch Voice Memos on your iDevice. Locate the track you would like to transfer to your Mac and select it.
Step 3: Click the share button and then wait for your computer’s AirDrop icon to show on your iDevice. Tap on the icon.
The selected voice memo will download to your Mac. You should find it in the Download’s folder.
If Your Mac Does Not Support AirDrop
Maybe you are using an older Mac. If this is the case, the Mac may not support the cross-device AirDrop. To transfer your Voice Memos to your Mac without the AirDrop, follow the steps outlined below:
Step 1: On your iOS device, launch Voice Memos.
Step 2: After locating the voice memo you would like to transfer to your Mac, select it.
Step 3: Click the share button and then tap the Messages option.
Step 4: Address the iMessage to your iCloud address and then tap Send.
Step 5: Turn on your Mac and use the OS X Messages app to open the message you sent in step 4 above. Download the voice memo to your computer.
3. Get Voice Memos off iPhone using Dropbox
You can use Dropbox to get voice memos off iPhone. After ensuring that you already have cloud storage on Dropbox, follow the simple steps we have outlined below to learn how to download voice memo from iPhone via Dropbox:
Step 1: On your iPhone, launch the Voice Memos application and choose the file you would like to transfer.
Step 2: Tap the share button. From the share options that appear, select Save to Dropbox.
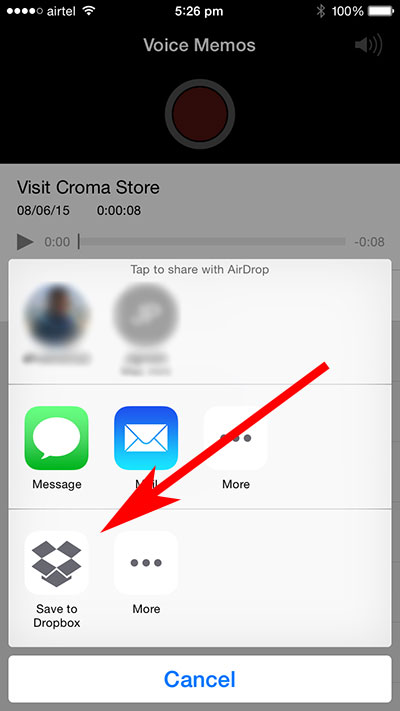
Step 3: If you would like to use a custom folder, click on “Choose a different folder”. Next, click Save. If your iPhone is connected to the internet, your voice memo should be uploaded to Dropbox.
Step 4: Now, launch Dropbox on your PC. Open the folder where you uploaded your memo. Download the voice memo.
4. Back Up Voice Memos on Computer Using iTunes
If your goal is to transfer your voice memos to the computer you use to sync your iPhone, you can use iTunes to get voice memos off iPhone. To learn how to save voice memos from iPhone using iTunes, you will need to follow the simple steps we have outlined below:
Step 1: Using a USB cable, connect your iPhone to your computer.
Step 2: Launch iTunes.
Step 3: Scan the top menu bar to locate the icon that represents the iPhone. Click on the icon.
Step 4: On the sidebar, locate Music under Summary and tap on it.
Step 5: If the “Sync voice memos” box is not already checked, check it.
Step 6: On the bottom-right corner, tap either Sync (or Apply).
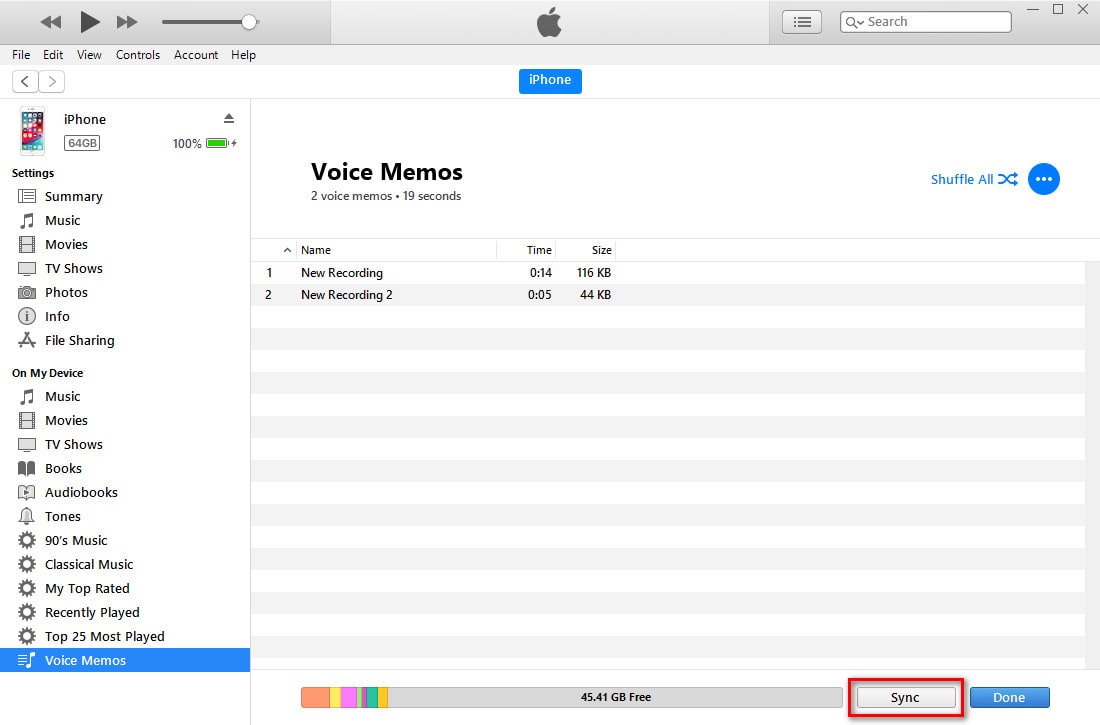
Your voice memos should be downloaded to your iTunes Library. If you want to store the voice memos in a different location, all you will need to do is drag and drop the memos in the location where you intend to store them.
5. Preview and Download Voice Memos to Computer with Data Recovery Tool
While the above methods have helped iDevice users get voice memos off iPhone in the past, there is no guarantee that they will actually work for you. For example, if your Mac does not have AirDrop, using the AirDrop method will be impossible.
Using a Data Recovery tool makes transferring voice memos from the iPhone extremely easy. On top of making the transfer easier, Data Recovery tools are capable of recovering lost files. This means that you get to transfer both the currently available voice memos and deleted memos.
A good example of a Data Recovery tool you can use to get voice memos off iPhone is iMyFone D-Back. Learning how to save voice memos from iPhone using iMyFone D-Back is actually not complicated. The steps we have shown you below should show you how to download voice memo from iPhone using iMyFone D-Back:
Step 1: Using a USB cable, connect your iDevice to your computer and launch iMyFone D-Back. From the D-Back Home interface, select Recover from iOS device. This option should be available on the column on your left-hand side. Next, tap Start.
Step 2: You will need to select the file types you intend to download to your PC from your iPhone. If you intend to only transfer your voice memos, select Voice Memo only. Click Next.
Step 3: On the next screen, D-Back will list all the voice notes available on your iDevice. You can preview the notes and select the ones you wish to move to your computer.
Step 4: Click the Recover button. On the popup that appears, select the folder where you want D-Back to save your voice memos. D-Back will transfer the files to your computer.
Note: On top of displaying the voice memos you currently have on your iPhone, a data recovery tool will also display deleted voice memos. Whether the deleted memos get displayed will depend on whether they have been overwritten or not. The data recovery tool will only display deleted voice memos which have not been overwritten.
How to Delete Voice Memos on iPhone after Exporting Them?
Chances are, you wanted to know how to get voice memo from iPhone so that you can save storage space. The steps we have outlined under different solutions in this article only show you how to download voice memo from iPhone. After you get voice memos off iPhone, you may want to delete the voice memos available on your iDevice. Below, we show you the steps you need to follow to delete the voice recordings you have on your iPhone:
Manually Deleting the Voice Recordings
Step 1: On your iPhone, locate the Voice Memos application and tap on it. This will launch it.
Step 2: To access the list of saved recordings, click the List icon on your iDevice.
Step 3: Locate the recording you intend to delete. Tap on the recording to select it. After selecting it successfully, the iPhone should highlight the entry blue.
Step 4: Click the Delete button. Next, tap Delete Voice Memo to remove the entry from your iDevice.
Deleting the Voice Memos Automatically
On iOS 12, Apple has focused on redesigning the Voice Memos feature. If your iDevice is running on iOS 12, your Voice Memos is more intuitive when compared to the feature available on older iOS versions. One of the features introduced in the iOS 12 Voice Memos app is the ability to delete the Voice Memos automatically.
The automatic delete allows iDevice users to set a time period that they want recordings to be available on their iDevice. After the time period has elapsed, the voice memos will be deleted automatically. If your goal is to keep the voice memos on your iDevice forever, this option is available too.
If your device is running on iOS 12 and you would like to keep voice memos from piling up on the iDevice, follow the steps we have outlined below:
Step 1: Locate the settings app on your iPhone or iPad and launch it.
Step 2: Under Settings, scroll down to locate Voice Memos. Click this option.
Step 3: Locate “Clear Deleted” and tap on it.
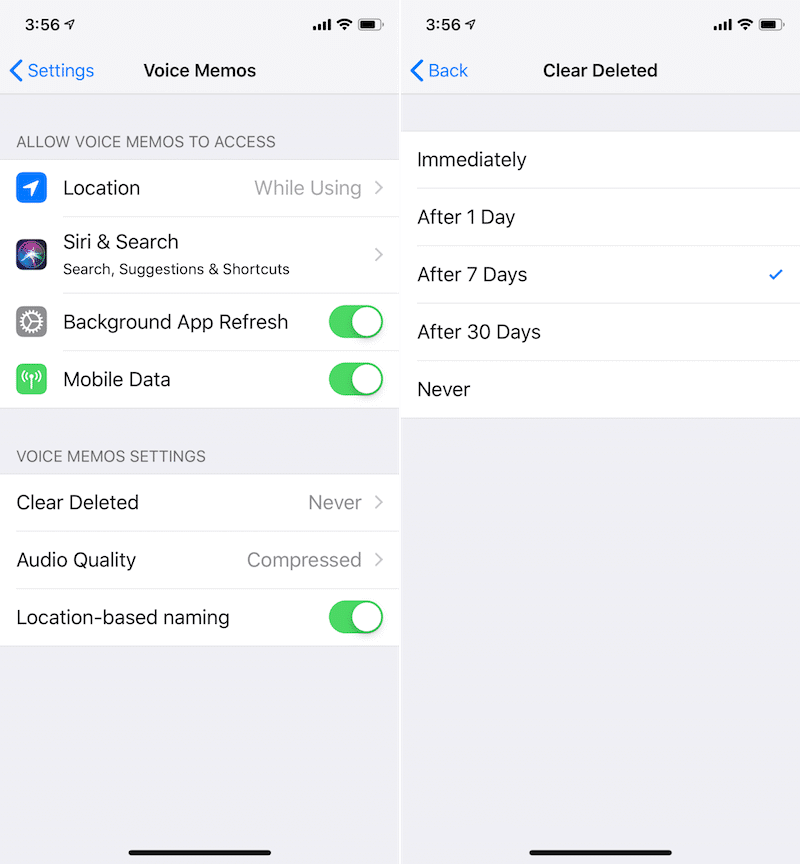
Step 4: Now, you can choose the time you want to retain your voice recordings on your iPhone before the iDevice deletes them automatically. The available options include:
- Immediately
- After one day
- After seven days
- After a month or 30 days
- Never
Summary
If you find that your voice memos are using a lot of space on your iPhone, the best solution you can use is to get voice memos off iPhone. In this article, we have shown you how to get the voice memo from iPhone. The first 4 solutions we have listed above do work. However, some of them may fail to work.
The data recovery tool is guaranteed to work. The data recovery tool will help you transfer the currently available voice memos and deleted memos to your computer, as well as other mobile data like text messages, photos, and notes, etc. The first three solutions are incapable of helping you recover your lost voice memos.
We have shown you how to delete your voice memos. After transferring your voice memos to your computer, the files will still be available on your iDevice. Deleting them will help you save storage space.