If you regularly work with Portable Document Format (PDF) and Word files, you may want to insert PDF into Word. If this is something you have not done before, it may appear quite complicated. In reality, inserting a PDF file into Word is not complicated. In this article, you will learn how to insert PDF into Word.
1. Use Adobe Acrobat to Insert PDF into Word Doc
Adobe Acrobat built-in converter allows its users to convert a PDF file to Word. You can then insert the converted file into Word.
For this to work for you, you will need a full version of Adobe Acrobat which tends to be expensive. Below, we will show you the steps to follow to insert PDF into Word using Adobe:
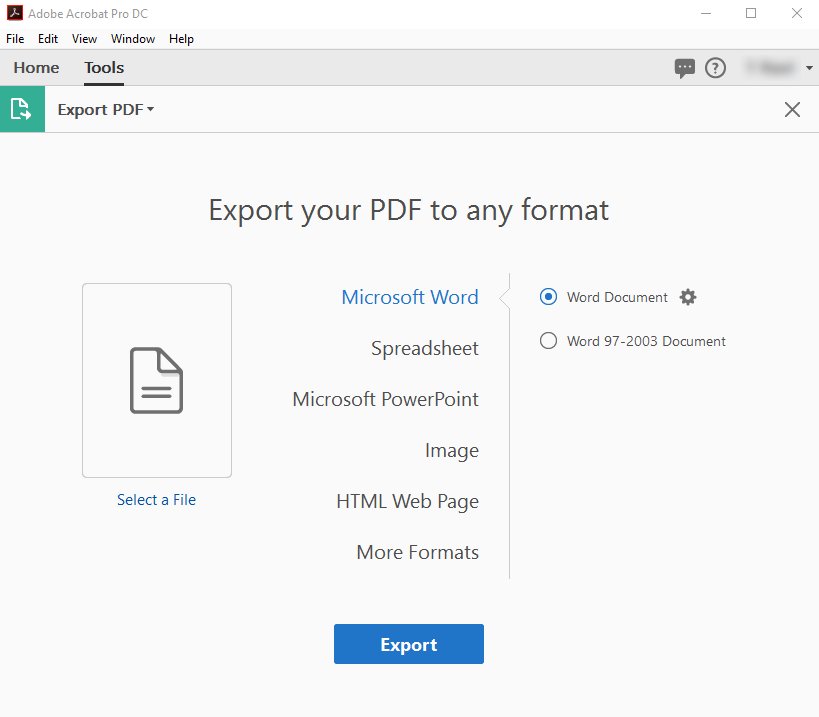
Step 1: Launch Adobe Acrobat on your computer and then select Export PDF.
Step 2: Add the PDF file to Adobe Acrobat. Next, choose the format you would like to convert the PDF file to – for our case, choose Word – and then tap Export. Save the file and then close Adobe Acrobat.
Step 3: Locate the Word document to which you wish to insert the PDF file. Right-click on it and select Open with Microsoft Word.
Step 4: Insert the file you converted in step 2 above by going to Insert > Object > Create from File > Browse. Locate the file and select it.
2. Use Google Docs
If you do have an internet connection, you can take advantage of Google Docs to insert your PDF file into Word. The process will, however, require a Google Account – if you are yet to create an account, you can easily create one for free. To learn how to insert PDF into Word via Google Docs, you will need to follow these steps:
Step 1: On your computer web browser, visit drive.google.com. If you are not logged into your Google account, simply enter your Google email and password to log in. If you do not have a Google account, follow the onscreen instructions to create the account.
Step 2: On the top-left corner, click on the New button. Next, select File Upload. Locate the File you would like to insert into Word and upload it to the drive.
Step 3: Once the file is uploaded to the drive, right-click on it, choose Open With > Google Docs. Wait for the conversion process to finish.
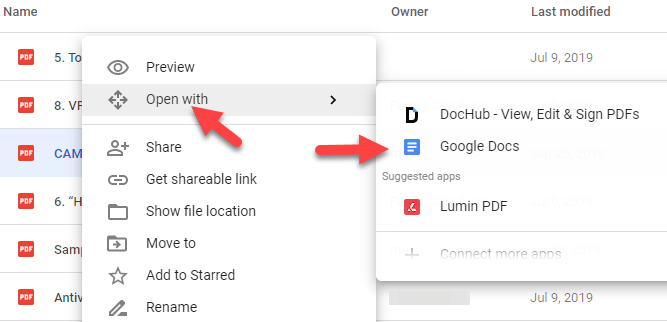
Step 4: Once the document is converted into a Google Doc, it will open in your browser. Now, you can simply copy and paste the document you wish to combine it with, edit the whole document, and then download it as Microsoft Word document. To download the file as a Word document, select File on the top-left > Download > Microsoft Word.
3. Insert PDF into Word as an image
One of the most ideal ways of inserting PDF into Word is by converting the PDF into an Image, say JPEG or PNG file, and then inserting the image into your Word file. While this method may have more steps, it is not complicated. In fact, if you already have Word installed on your computer, you won’t need to download and install a third-party application on your computer.
To learn how to insert PDF into Word by first converting the PDF into an image, follow the steps we have outlined below:
Step 1: Convert PDF to an image
To convert a PDF to an image, you need a free PDF converter. PDF WIZ is one of the best converters that can help you turn a PDF into an image. First of all, it’s a completely free desktop program for Windows. Besides, it has no feature limit or file size limit.
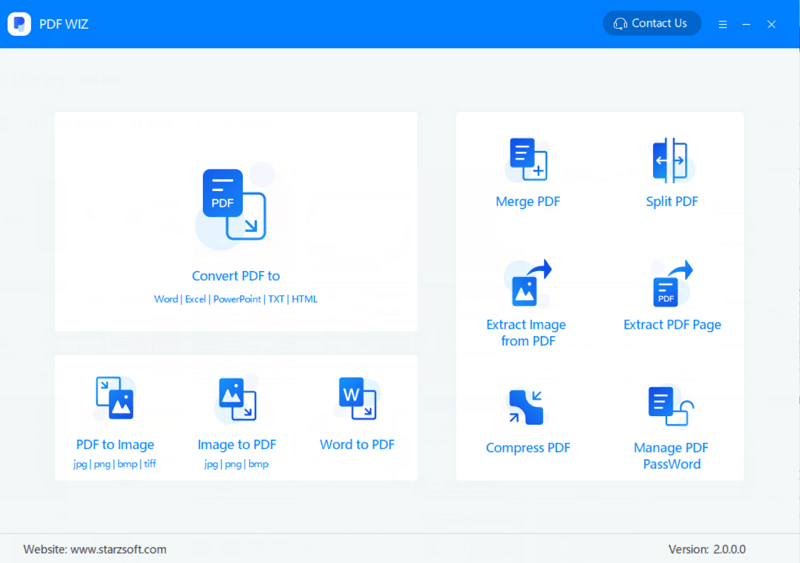
How to convert a PDF to an image for free using PDF WIZ:
- Download PDF WIZ and launch it on your Windows computer.
- Drag and drop PDF to the converting box.
- Click the icon to open the converted images.
Free DownloadSecure Download
Step 2: Copy the images into Word document
This last step should be relatively easy for you. The process is straightforward. All you will need to do is launch the Word document in which you would like to insert the images. Next, select the location where you want the PDF document to appear.
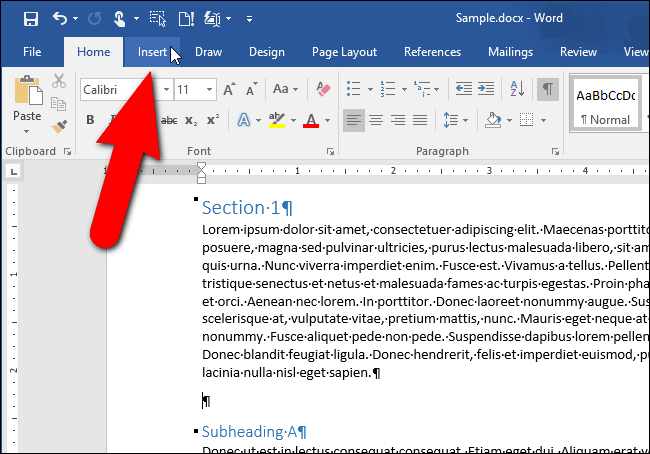
On the menu available at the top of the page, hit the Insert tab and then choose the Pictures icon. Locate the image you would like to insert to the Word document and select it. This should insert the image to your document. You can then go ahead and edit the image to fit with the flow of the text.
4. Use the Insert Object feature in Word
It is possible to insert different types of objects to Microsoft Word documents. These will include Excel charts, PDF files, and even PowerPoint Presentations. One key thing you need to note is that much of the original formatting present in the PDF file may be lost once you insert it into Word as an object.
Option 1: Insert PDF as an embedded object
The steps you will need to follow to insert PDF into Word as an Object are very simple – simpler than the steps we have already described above. If you will not mind the changes in formatting, follow the steps below to insert PDF into Word as an Object:
Step 1: Launch the Word document in which you would like to insert the PDF document. On the Word menu, select Insert and then choose Object.

Step 2: Next, select the Create from File tab. Locate the PDF you would like to insert into the PDF via the Browse button.
Step 3: Insert the PDF object (in this case, the PDF file) into your Word document.
Option 2: Insert PDF as a linked object
Inserting your PDF file using the linked object option means that only its first page will appear, but it will also be linked to the original PDF file. You will also have the option to display the file as an icon in Word instead of the preview – when selected, either option will open the PDF document:
Step 1: Open the Word document in MS Word and place a cursor where you wish to insert your PDF.
Step 2: Click the Insert tab > select Object > click Create from File.
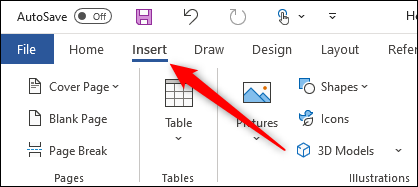
Step 3: Click Browse on the dialog box and select the PDF file you wish to insert.
Step 4: Check the Link to File option to insert PDF into Word as a shortcut to your original file. To insert an icon instead of preview, select Display as Icon. Click OK.
Option 3: Insert text only using the MS Word Object
This solution will insert the text from your PDF document into Word. Keep in mind that the result may not look good if the original document has a lot of text formatting and graphics:
Step 1: Open the Word document in MS Word and place your cursor where you want the PDF file to go.
Step 2: Choose the Insert tab > click the Object option > select Text from File.
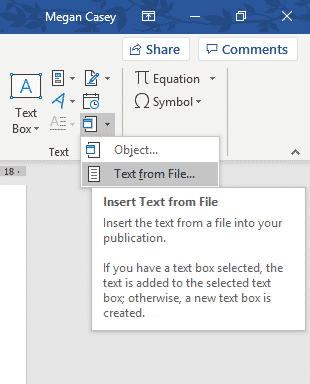
Step 3: Locate the PDF file and then select Insert.
Step 4: Ensure the right file is selected and then click OK.
Step 5: If a pop-up appears, click Ok on it and wait. The text in your PDF file should appear where you had placed the cursor. If the text doesn’t look great, edit it.
5. Copy texts from PDF and paste them to a Word file
If you are looking for a low-tech solution to help you grab the PDF text and insert it in your Word document, the steps we have in this section should come in handy. In this section, all you will need to do is copy and paste the text present on the PDF document. It is worth noting that this method will work if the PDF file features text only.
Compared to the method described above, this method has its own benefits. The main benefit is that you will get a chance to edit the text and ensure that it matches the text you had on the Word document originally. Below, we have the steps you will need to follow to implement this solution:
Step 1: First, you will need to open an existing Word file or a new document. This should be the document you want to insert the PDF file into.
Step 2: Double click the PDF file to open it. Once the PDF opens, highlight the text you would like to use on your Word document, right-click on it, and then choose copy.

Note: The copy option works ideally if the PDF document does not feature a lot of formatting. If the document does have a lot of formatting, the copy option may not have the ability to grab all the text.
Step 3: With the text in the clipboard, go to your Word document. Right-click on the document and choose the Paste option. The text should be pasted on the document. Now, you can go ahead and format the pasted text to look the same as your original text.
6. Convert PDF to readable doc using MS Word
This is another easy solution you can use. All you will have to do is open the PDF document in Word. Below, we have the simple steps you will need to follow:
Step 1: Launch the Word software.
Step 2: On the menu available at the top, select File and then choose Open. Scroll to locate the PDF file you would like to insert into Word.
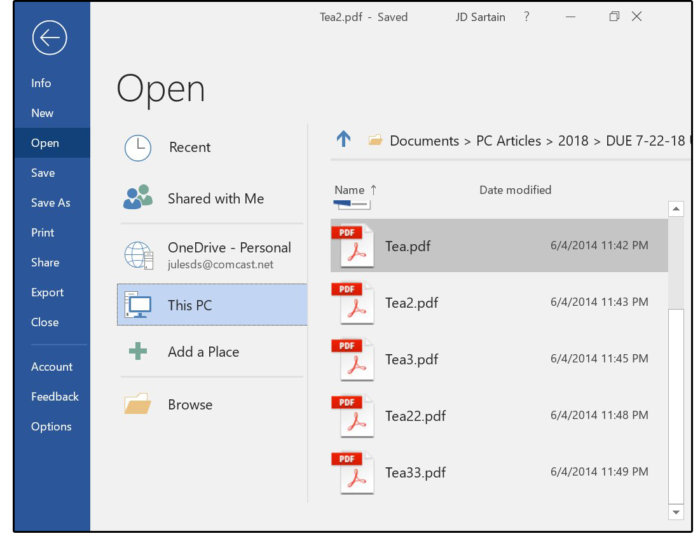
Step 3: Once you locate the document, select open. The Word software will take a couple of minutes to convert the PDF file into a Word readable format.
Note:
- This solution will work on Word 2013 and later. If you are using, say Word 2007 or Word 2010, you may want to use the other solutions described above.
- After the conversion is complete, double-check the file. If the file features text only, your document may still look great. However, if the document does have charts and a lot of graphics, it could be messy. If the document is messy, you should format it.
7. Link to an external PDF
If none of the solutions outlined above have worked for you, linking to the PDF file may be a good idea. If the PDF document is already online, all you will have to do is insert its link in the document. If the document is not online, consider uploading it to a free file-sharing site – a good example here would be Google Drive.
After uploading the file to Google Drive, be sure to create a link that you can use to hyperlink to the document in your Word document.
Note: This method has one major drawback. The individual reading the Word document will need an internet connection to access the PDF document online.
Bonus tip: Insert PDF into Word as an image on Mac
The methods we have described above – except the method for inserting PDF as an image – will also work on Mac computers. A PDF WIZ version for Mac is currently unavailable. However, if you would like to insert your PDF file into Word as an image on your Mac, you can take advantage of the screenshot feature. The steps you will need to follow are outlined below:
Step 1: Open the PDF file containing the information you would like to add to Word.
Step 2: Go to the page you would like to insert and take a screenshot. To take a screen-shot on Mac, you will need to press Shift-Command-4.
Step 3: Open the Word document on MS Word and place a cursor on the location where you wish to insert the PDF file.
Step 4: Go to Insert > pictures and select the screenshot you took in step 2 above. Repeat this process to insert several pages.

Differences between Mac and Windows when inserting PDF into Word
As noted earlier, most of the methods of inserting PDF into Word described above work on both Mac and Windows computers. However, these methods may have slight differences. The main differences include:
- To insert PDF into Word using Mac, you won’t have to select Create from File > Browse as you would do when using Windows. Instead, you will just need to select Insert Object > From File.
- If you need to insert text only, Mac’s Preview feature comes in handy. Open your PDF file in Preview > select the Text tool > highlight the Text > and then copy and paste this in your MS Word file.
- Unlike Windows, Mac allows you to preview and then pick the pages you are interested in from your PDF file – you can insert these in your Word document. Windows will only insert the first page of your selected PDF file.
Summary
If you would like to use information present on a PDF file in your Word file, the solutions outlined in this article should help you. Converting the PDF document into an image and then inserting the image in your Word document may offer you the best results. If you insert PDF into Word as an object, the PDF file formatting may be messy.
