Determining that your Android device cannot install any new application updates because it has run out of storage space is quite annoying. What most people do not know is that they can save their storage space by simply getting rid of useless data available on their device. In this article, we will focus on showing you how to empty trash on Android.
Can You Find a Trash or Recycle Bin Folder on Android?
If you have used a computer before, you are probably familiar with the Trash folder on macOS and the Recycle Bin on Windows PC. These folders store most of the data you delete – if you need the data back, you can always restore it.
On Android devices, unfortunately, a Trash or Recycle bin does not exist. This is because the majority of the Android devices feature limited storage capacity, ranging between 8 and 256 GB. For this reason, maintaining a dedicated folder for collecting the trash is just not feasible.
What this tells you is that if you would like to get rid of junk files on your Android device, you will have to look for the data you do not need on different applications and remove it one by one. This article will focus on showing you how to do this.
How to Empty Trash on Different Android Applications
While a dedicated Trash folder does not exist on Android devices, some of the Android Apps do have the trash folder. In this section, you will learn how to access the trash folder on the different apps and clear out the junk files.
1. Remove Junk Files on Google Photos
Google Photos is an ideal application for managing photos. The application allows you to keep your photos safe by creating backups. If you happen to delete a picture on Google Photos, the picture will be moved to the Trash folder where it will remain for 60 days before getting erased permanently. To save your device storage space by deleting the useless photos existing in Google Photos trash folder, you will need to follow the steps below:
Step 1: On your android device, launch Google Photos by simply tapping its icon. Tap the hamburger menu icon available on the top-left corner.
Step 2: From the list of the options which appear, select the Trash option. This should display the pictures you deleted within the last 60 days.
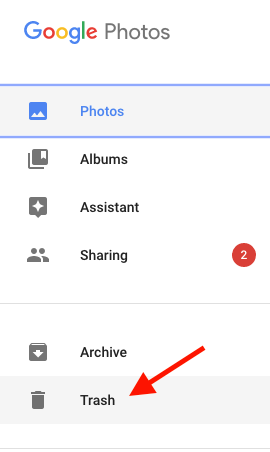
Step 3: Select the pictures you would like to delete permanently and then tap the delete icon available on the top-right corner.
2. Empty Trash on Gmail
Similar to the Google Photos application, your Gmail app can also accumulate a lot of useless emails in the Trash folder. When you delete an email, the email is moved to the Trash folder where it stays for 30 days. To get rid of the useless emails in the Trash folder, you will need to follow the steps below:
Step 1: Launch the Gmail application and hit the hamburger menu icon on the top-left corner.
Step 2: From the list of options, select Trash.
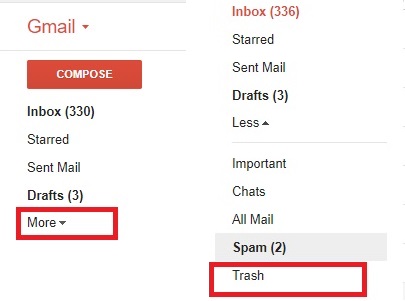
Step 3: Select the emails you would like to delete permanently and then hit the delete icon.
Step 4: To empty the Trash folder in one go, hit the “Empty Trash Now’ option.
3. Clean Up Dust Bin on Dropbox
If you do use Dropbox on your device, chances are, you may have some useless files in the Trash folder. Considering that the free version of the app will only allow you 2 GB of storage, clearing the junk files can be extremely useful.
Step 1: Launch the Dropbox application on your Android device and visit the Trash folder by hitting the Trash icon.
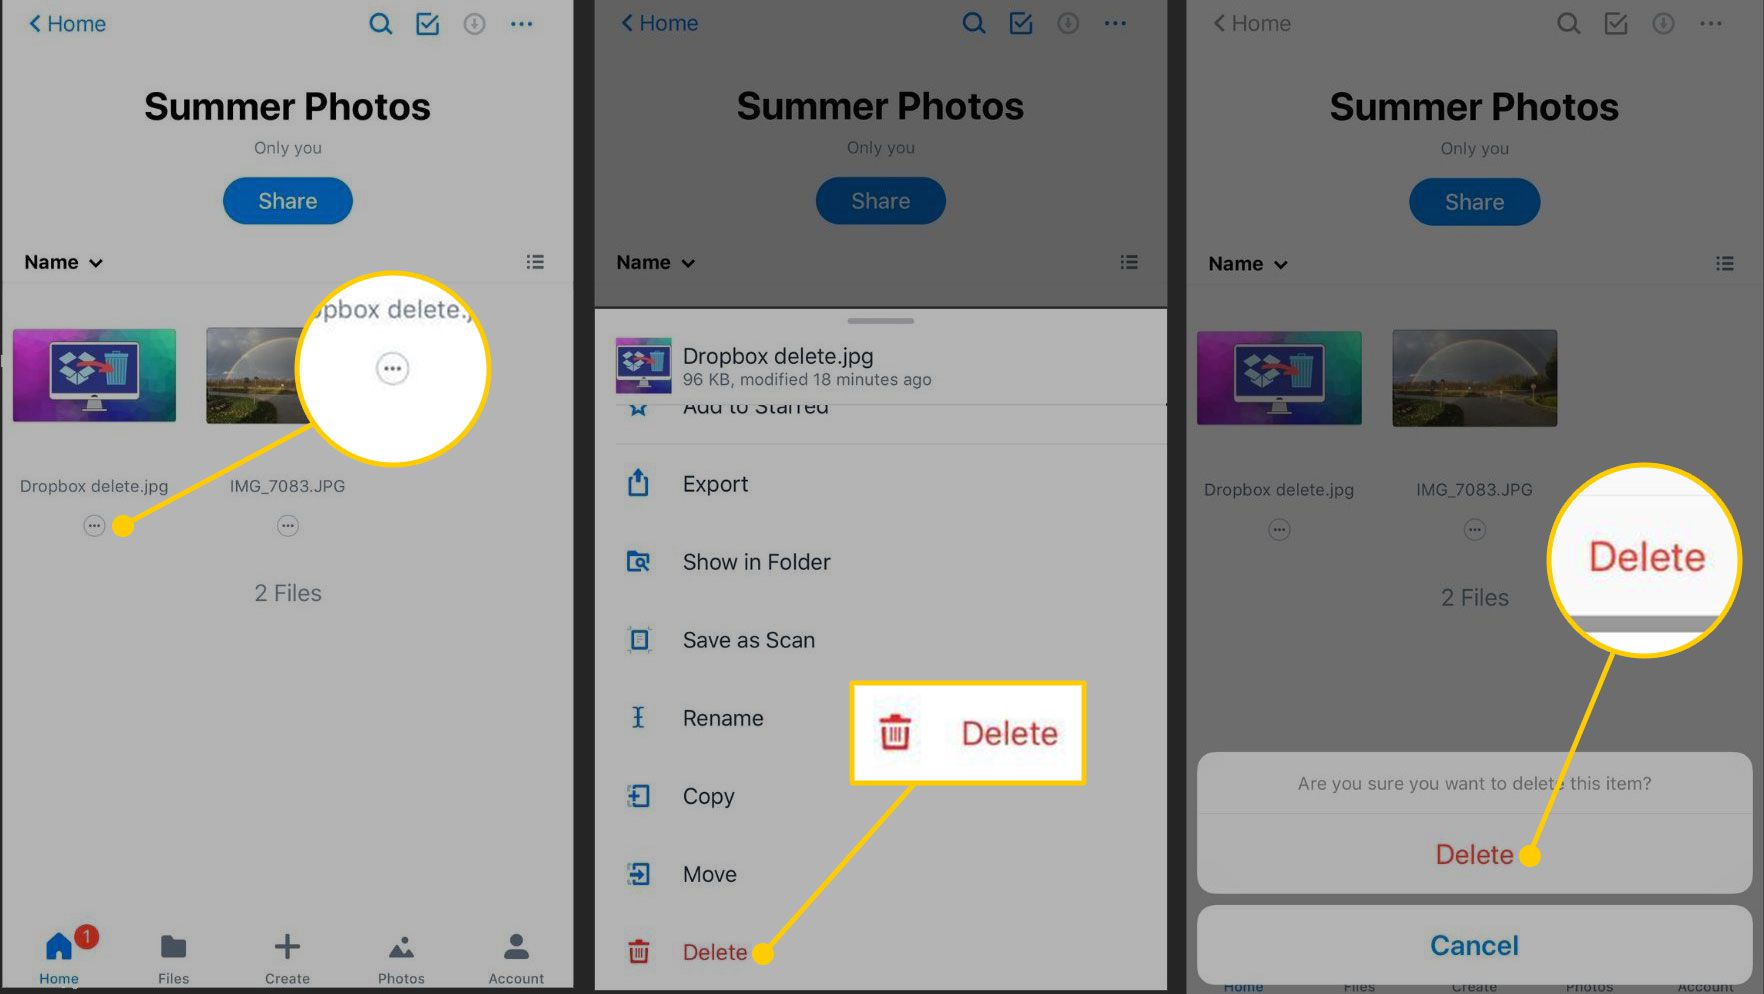
Step 2: Select the files you would like to delete and then hit the Delete button. After confirming your choice, the files should be deleted permanently.
4. Use a Recycle Bin Application
The fact that Android devices do not have the Recycle Bin by default does not mean that you cannot add one yourself. By installing the right recycle bin application, you should have the ability to manage your deleted files more easily.
To get an ideal Recycle Bin application, you will just need to use the keywords “Recycle Bin Application” on the Google Play Store (play.google.com) and compare the ratings and reviews for the applications which appear. After installing your chosen application, you will just need to follow the onscreen instructions to customize the application according to your preferences.
Other Ways to Empty Trash on Android
Locating the Trash folder on different apps and deleting the junk files is not the only way to empty trash on Android. You can also use the following methods to save your storage space:
1. Clear the Cached Data
Cached data is basically intermediate data stored by the apps you have on your device. The data helps the applications offer a more customized experience. Although the data does help enhance the application experience, it usually takes a big toll on the storage space. Below, we will show you how to get rid of this data:
How to Clear Cache for a Specific App
Step 1: Go to Settings > Apps and then select the application whose cached data you would like to clear.
Step 2: Visit the Storage option for the app and then hit the Clear Cache button.
How to Clear Cache for All Apps at Once
Step 1: Visit Settings > Storage > Cached Data.
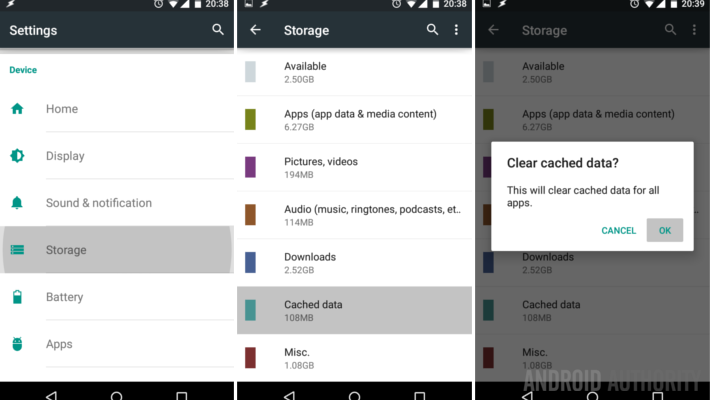
Step 2: After selecting the cached data, confirm that you would like to clear it by hitting the Ok button on the popup.
2. Delete the Downloaded Files You Don’t Need
It is not uncommon for Android device users to download content from the internet that becomes useless after a couple of weeks. Getting rid of useless content can help you save a lot of storage space.
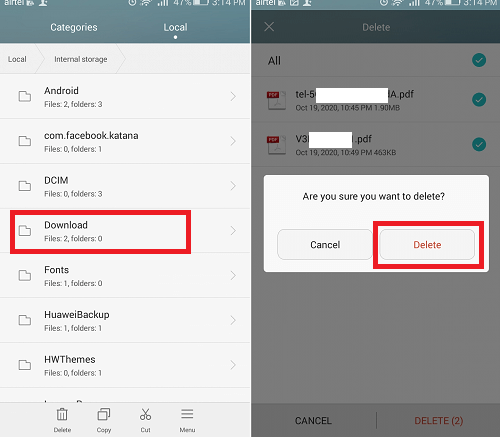
Step 1: Go to the File Manager > locate and click the Downloads folder (for some devices, this may be labeled Download History).
Step 2: Select the files you no longer need and then hit the Delete button.
3. Delete the Backed-Up Pictures
If you do use Google Photos, the application does create a backup for your pictures online, in your Google Account. In most instances, there is no need to have pictures in your Google account and have the same photos on your device. Luckily, Google Photos makes it extremely easy for you to save device storage:
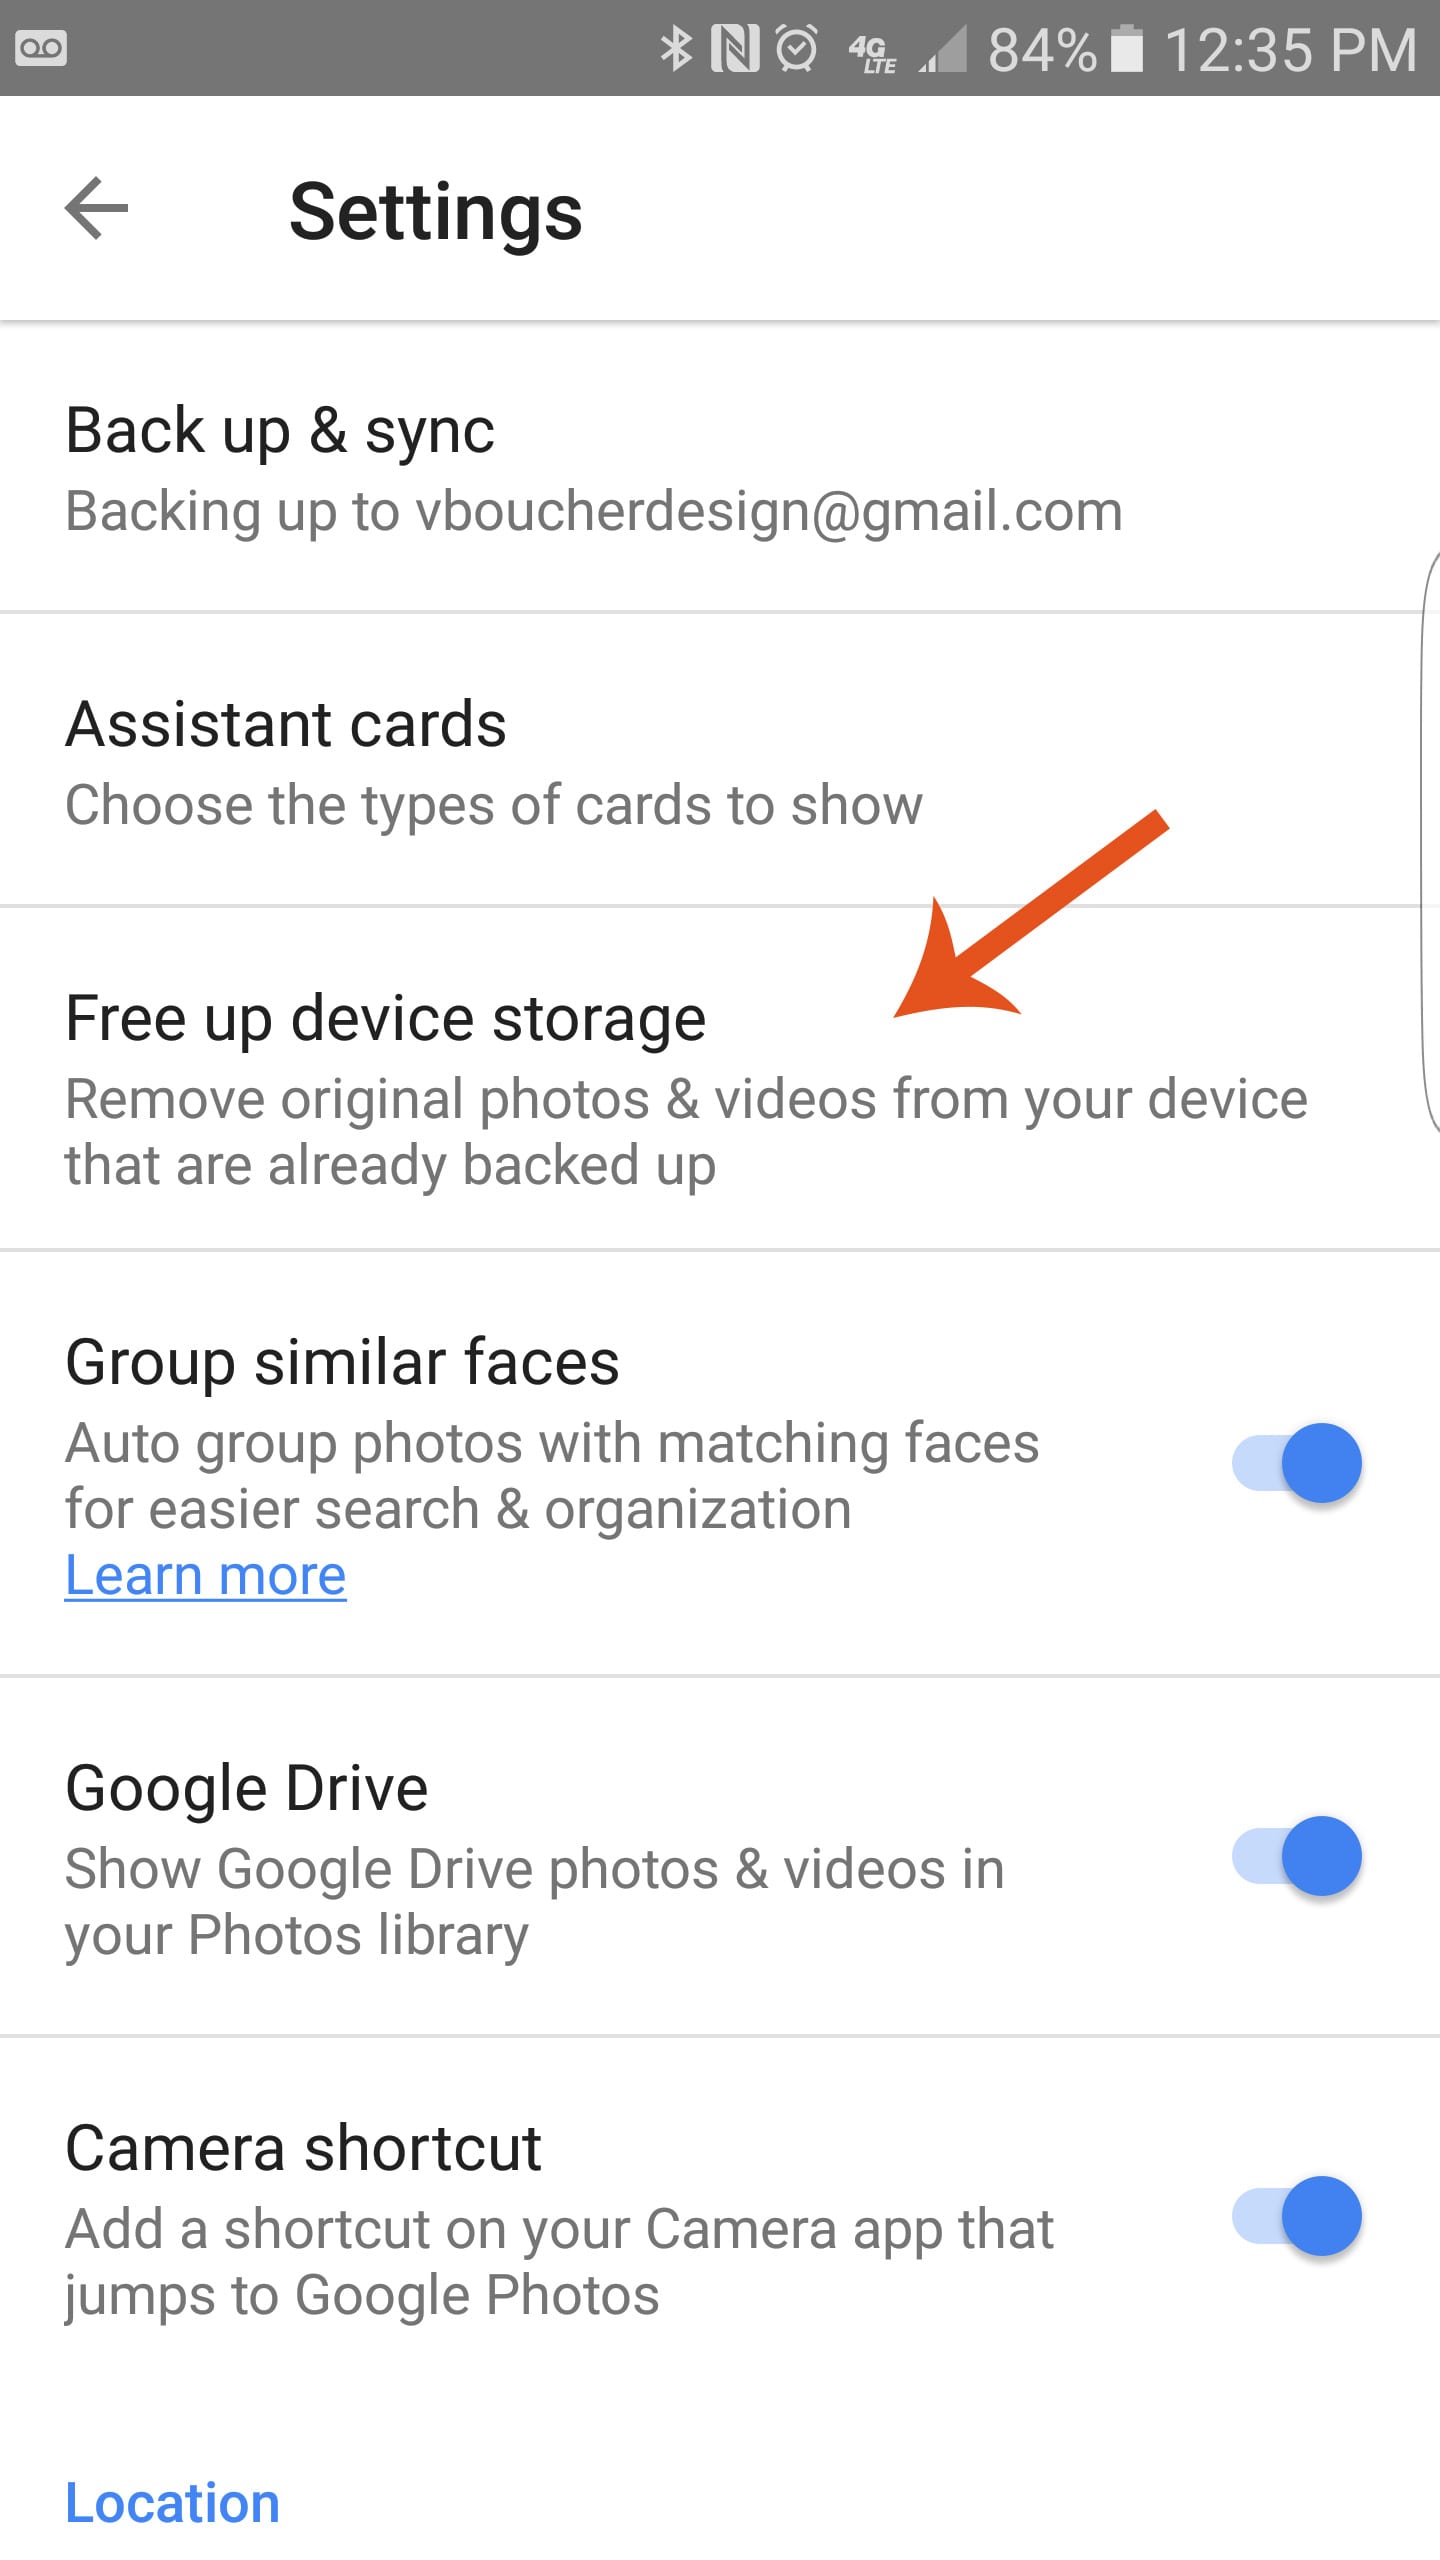
Step 1: Open the Google Photos application.
Step 2: In the top-left corner, tap the menu icon and then select “Free up device storage” and then hit the OK button.
Note:
- If you are currently storing lower-resolution of your photos on your Google account, the “free up device storage” option will delete the full-resolution pictures you have on your device. If you do not want to lose the full-resolution pictures, store them elsewhere before using the option.
- Most people do snap more than one picture (at a go) using their Android devices. Consider deleting the duplicate photos from your device to save storage space.
4. Manage the Downloaded Music
Most Android device users do like music. Chances are, for the time you have had your Android device, you have downloaded numerous songs. Some of the songs could have grown old and you may no longer listen to them.
Accessing the music application and deleting the songs you don’t listen to could help you empty trash on Android. If you do use music streaming applications like Google Music or Spotify, avoid saving songs offline since this could end up taking a lot of space.
5. Uninstall Your Least Used Applications
Applications can take too much space. If you do have some applications you don’t use, unloading them could help you empty trash on Android. Below, we will show you how to uninstall the applications:
Method 1
Step 1: From the home screen, long-press the application icon.
Step 2: Select the uninstall option.
Method 2
Step 1: Visit Settings > Apps.
Step 2: Select the application you would like to uninstall. Once App info opens, select Uninstall and confirm your choice.
6. Take Advantage of Smart Storage
If your device is running on Android 8 or later, it should have the Smart Storage feature. The feature makes it possible for you to get rid of the duplicated and unneeded data. To turn on Smart Storage, you will need to follow the steps below:
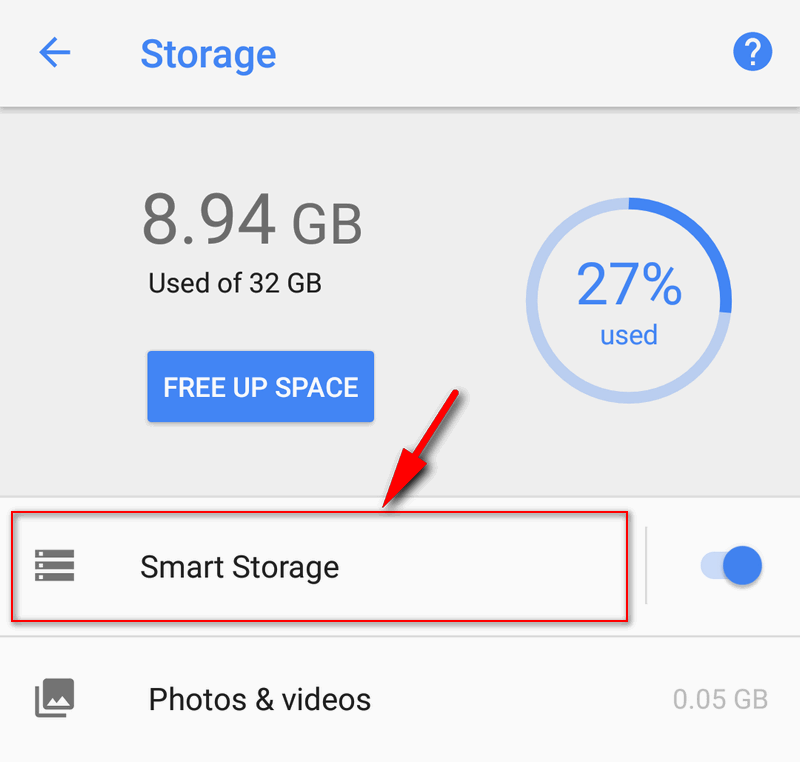
Step 1: Visit Settings and choose Storage.
Step 2: Turn on Smart Storage.
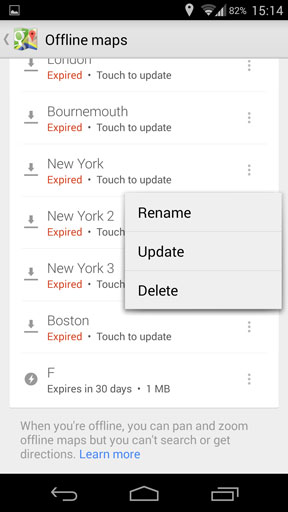
7. Erase Offline Area on Your Google Maps
If you have downloaded the latest version of Google Maps, navigating even when you do not have internet access should be possible. However, the map areas you store offline may cost you too much storage space. By deleting the offline areas, getting back your storage space should be possible. To erase the offline areas, you will need to follow the steps below:
Step 1: Open Google Maps.
Step 2: Tap the menu icon on the top-left corner and then select Offline.
Step 3: To delete an offline area, select it and then tap Delete.
8. Take Advantage of Android Oreo Storage Features
If your device is running on Android Oreo, you should be able to empty trash on Android quickly and easily. To learn how to empty trash on Android Oreo, you will need to follow the steps below:
Step 1: Open Settings > Storage.
Step 2: Tap on the sections listed to see a list of apps and the amount of storage space they occupy.
Step 3: Tap on each application and you should be able to use the Free Storage button to empty trash on Android. Keep in mind that using the button will clear all the files being held in the chosen app.
Note: On Android Oreo’s Storage manager, you should be able to find the “Free up space” button. On tapping the button, the button should help you get rid of the less useful data.
9. Use an SD Card
If you have been using the Android device internal storage, an SD card can help you remove some of the data from the internal storage. Simply invest in an SD card, insert it in the memory card slot and then move music, videos, and other data to the card.
Part 4: Get Back the Photos You Lose When Cleaning Trash on Your Android Device
When showing you how to empty trash on Android, we have talked about erasing duplicate pictures and deleting the already backed-up photos. When using this option, you could end up erasing your important pictures by mistake. While you could assume that you have lost your photos, this should not be the case – with the right tool, you can get your deleted pictures back.
The best tool for recovering deleted pictures is known as FindMyPhoto. On top of being easy to use, FindMyPhoto makes recovering your photos extremely quick – the tool will help you get all your pictures back within a couple of seconds.
FindMyPhoto is 100% free. This means that you won’t have to worry about having to upgrade to a paid version in order to keep enjoying all the features offered by the tool. When it comes to free apps, most people worry that they will have annoying popup ads – this is not the case with FindMyPhoto. The tool focuses on giving you the best experience. The tool’s deep scan feature makes it possible for you to find the pictures you deleted a long time ago.
The steps below will show you how to recover your lost pictures using FindMyPhoto:
Step 1: Download and install FindMyPhoto on your Android device.
Step 2: Launch the application. Choose either the Quick Scan or the Deep Scan and then wait while the tool scans your device.
Step 3: After the scan, you can preview your pictures and select the ones you would like to get back.
Summary
If your Android device is indicating that it is full, the steps in this article will help you empty trash on Android. If you do not want to erase any of your data to save space, investing in an SD card may be a better solution. If you delete your photos by mistake when deleting junk files, you can use FindMyPhoto to locate the pictures and get them back both quickly and easily.