Formatting a hard drive is the process of erasing all the data stored on the drive, including the operating system and any files and programs. It is often necessary to format your drive when upgrading to a new operating system or replacing a faulty drive. Formatting a drive is fairly simple and anyone can log into their computer, and use the device manager to format their drive. However, many errors can sometimes restrict you from logging into your computer normally. In such instances, you may be required to format hard drive from bios. So in this article, we will discuss how you can do it in simple steps.
However, it is important to note that formatting for the drive will delete all data currently present on your drive. And it is never ideal to lose all your precious data, is it? So, in the end, we also have a bonus tip to help you recover all data instantly even after formatting your drive.
Can You Format a Hard Drive from Bios?
If you search the internet with the question “Can I Format a Hard Drive from Bios? ” you will find a mixed bag of answers, some suggesting yes and others claiming you can not. To put it simply, it is NOT the BIOS that executes the format, BIOS is simply a low-level software that runs before the operating system and provides the interface between the hardware and the operating system. It is up to the operating system (OS) you have installed on the computer that executes the command. BIOS is an intermediary that facilitates the process.
How to Format Hard Drive from Bios?
Our computers often run into errors and troubleshooting them requires formatting the drive. However, as many users alluded, you may not always gain access to your computer and format it using a conventional method. So a better approach is to use the BIOS setting and use its interface to format the hard drive. Here is a detailed step-by-step guide on how to do it.
Way 1. Via Windows installation
We previously mentioned how the BIOS itself can not format your hard drive. However, with the help of an operating system, it has the ability to execute the operation. So, the first step we are going to show is formatting your drive via Windows installation. Here is a detailed step-by-step guide on the processes to follow.
- Step 1: Insert the Windows installation media into your computer and boot from it. You may need to adjust your boot settings in your computer’s BIOS to prioritize the installation media.
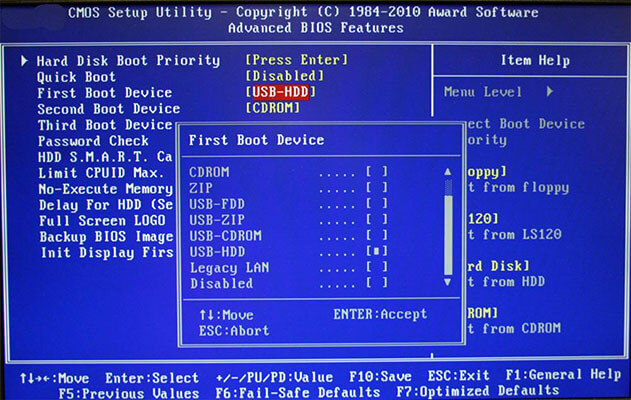
Note: To enter into the BIOS setting, you may have to enter F2, F8, F10, F11, DEL, ESC, etc depending on the brand of motherboard you are using. To find out the exact setting for your device, search the box or the homepage of the manufacturer’s website.
- Step 2: After entering BIOS mode, use the arrow key on your keyboard to navigate to the “Boot tab”. Now, set the Windows installation drive or disk number as 1 and press “Apply Now”.
- Step 3: Now restart your computer and you will see the computer will load the “Windows Installation wizard” when it turns on.
- Step 4: Next, choose your language preferences and click “Next.”
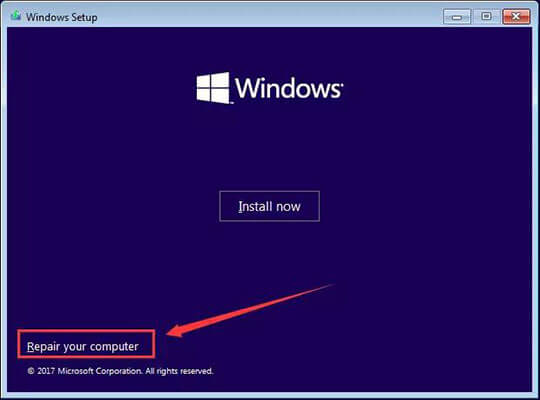
- Step 5: Then, click “Install Now” to start the installation process. You may need to accept the license terms and click “Next.”.

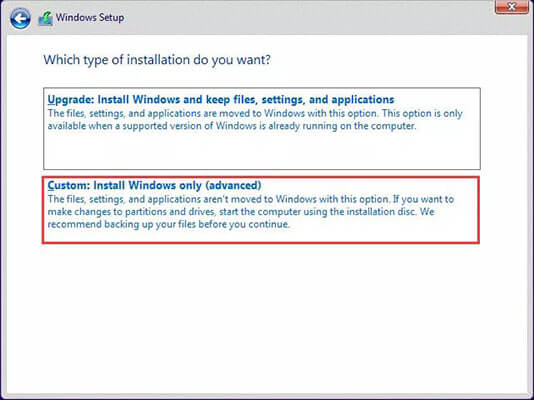
- Step 6: Now you will see two options to install the window. Choose the second “Custom: Install Windows only (advanced)” option.
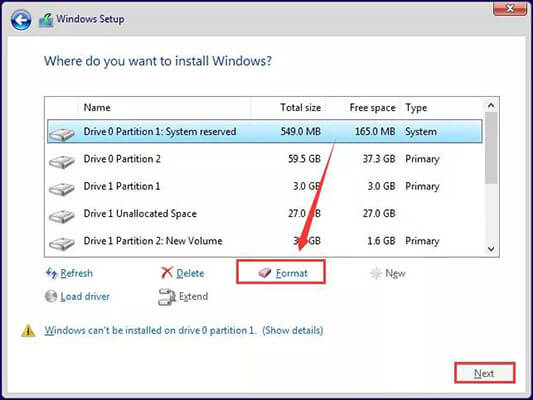
- Step 7: Now you will have a list of drives where you want to install the window. Select the drive that you want to format and click “Format.” This will delete any existing partitions and data on the drive. Press “Next” to continue.
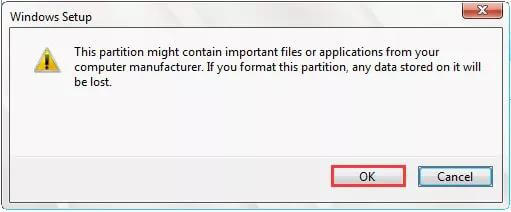
- Step 8: You may receive a warning prompt, reminding you that formatting will delete all data. But do not worry, we will help you recover all your data, just press “OK” to continue.
- Step 9: Wait for the installation process to complete. Once finished, your drive will be formatted and ready for use.
And that’s it, you have successfully formatted hard drive through BIOS.
Way 2. Via Command Prompt
The step above should allow you to format hard drive from bios. However, if you face any difficulty, here is another workaround that should help you out. This time we will use the “Command Prompt” and here is a detailed guide for you to follow.
- Step 1: Similar to way 1, insert the Windows installation media into your computer and boot from it and enter BIOS mode. (You can find details on the above step).
- Step 2: After entering BIOS mode, use the arrow key on your keyboard to navigate to the “Boot tab”. Now, set the Windows installation drive or disk number as 1 and press “Apply Now”.
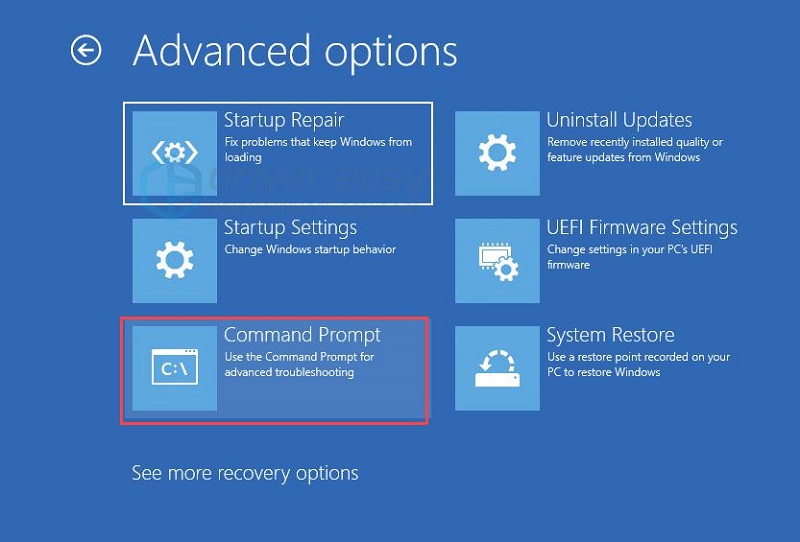
- Step 3: Now restart your computer and you will see the computer will load the “Windows Installation wizard” when it turns on. However, unlike way 1, tap on the “Repair your Computer” button.
- Step 4: Next, navigate to Troubleshoot > Advanced Options and select “Command Prompt”.
- Step 5: Now, open Command Prompt and type “diskpart” and press Enter.
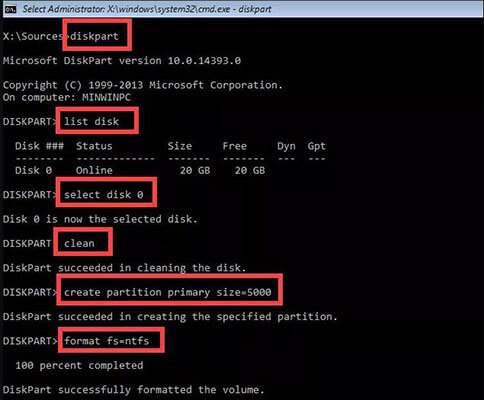
- Step 6: Now type “list disk” and press Enter to see the list of available disks.
- Step 7: Next, identify the disk you want to format and type “select disk X” (replace X with the disk number).
- Step 8: Now type “exit” to exit diskpart.exe
- Step 9: Now enter dir F, here F means the drive you want to format. You can also use C, D, or E if you want to format those drives.
- Step 10: Now type “format F: /fs:ntfs” and press Enter to format the partition as NTFS. You may be prompted with a warning reminding you that this step will delete all data from your drive. You can proceed by typing “Y”.
Congratulations, your drive should now be formatted and hopefully resolve the error that initially prompted you to format the drive in the first place.
How to Recover Lost Files After Formatting Laptop Hard Drive from Bios?
At the very start of the article, we mentioned how formatting is an effective way to fix any error you may encounter. However, this inevitably deletes all data present on the drive and nobody wants that. So, as promised, here is an easy way to recover lost files after formatting a hard drive from Bios. We will be using the StarzSoft Data Recovery app and below is a step-by-step guide on how to use the app to recover your data.
Free DownloadSecure Download
- Step 1: StarzSoft Data Recovery is a third-party app for windows, so first, download and install the app on your computer/laptop.
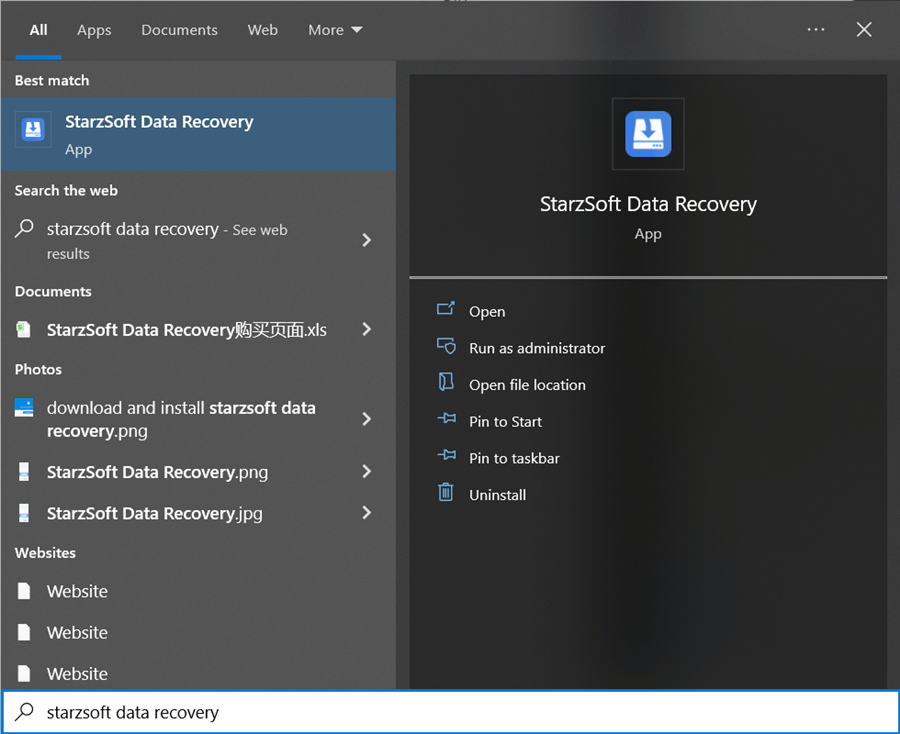
- Step 2: Now, launch the app by double clicking on the app or by typing “StarzSoft ” in the search menu, which you can launch by tapping on the Start menu found on the button left on the screen.
- Step 3: Once the app is launched, you will see all your drives labeled as shown in the image below.
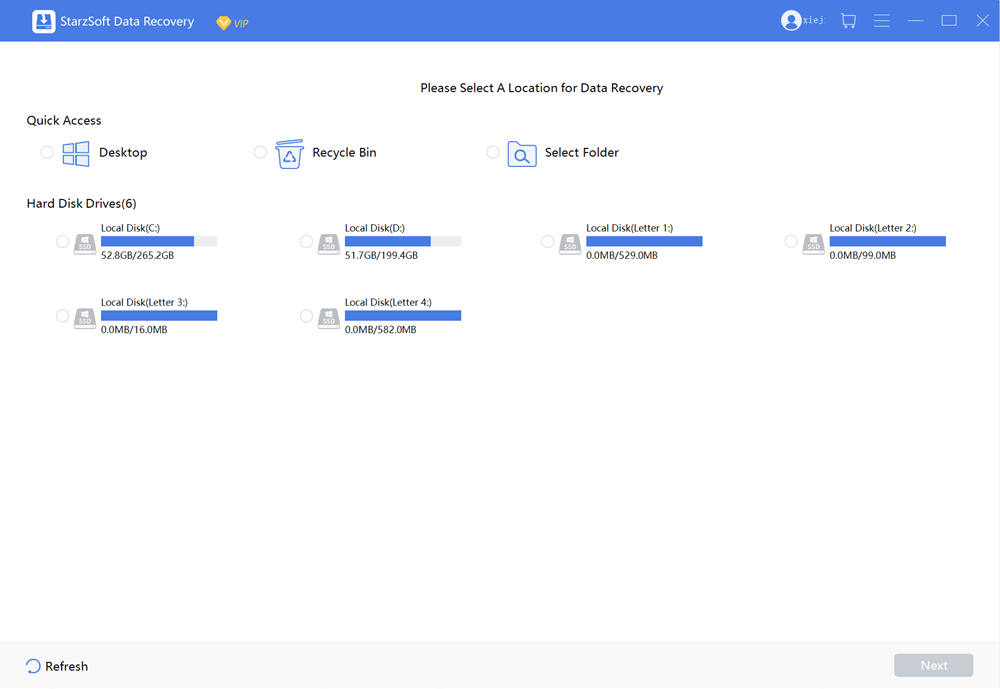
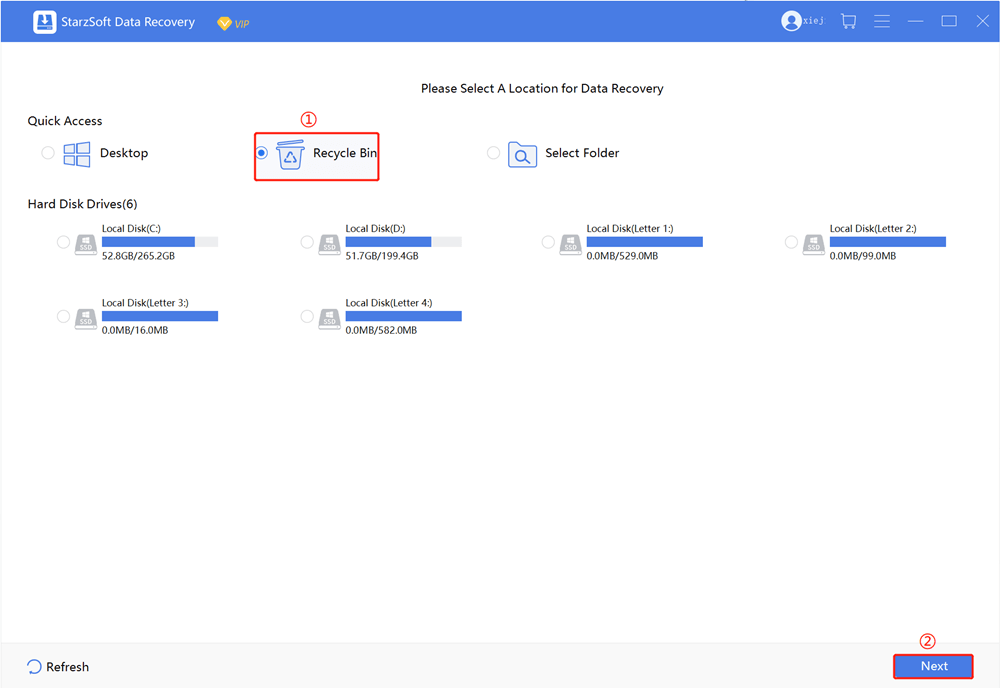
- Step 4: Next, select the drive you want to recover the data from. You can choose any drive, but for our example, we will try to recover the recycle bin. Once selected tap on “Next”.
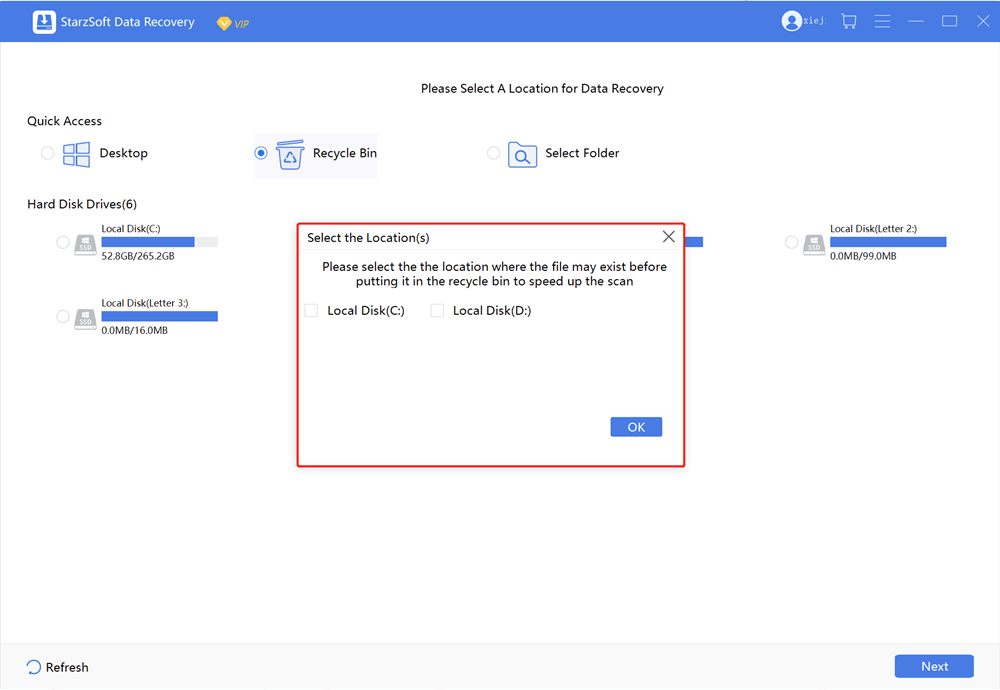
- Step 5: Follow the pop up window to choose the correct option.
- Step 6: Next, StarzSoft will scan the entire recycle bin and find deleted files to be recovered. Depending on the size of the drive, this step can take a while.
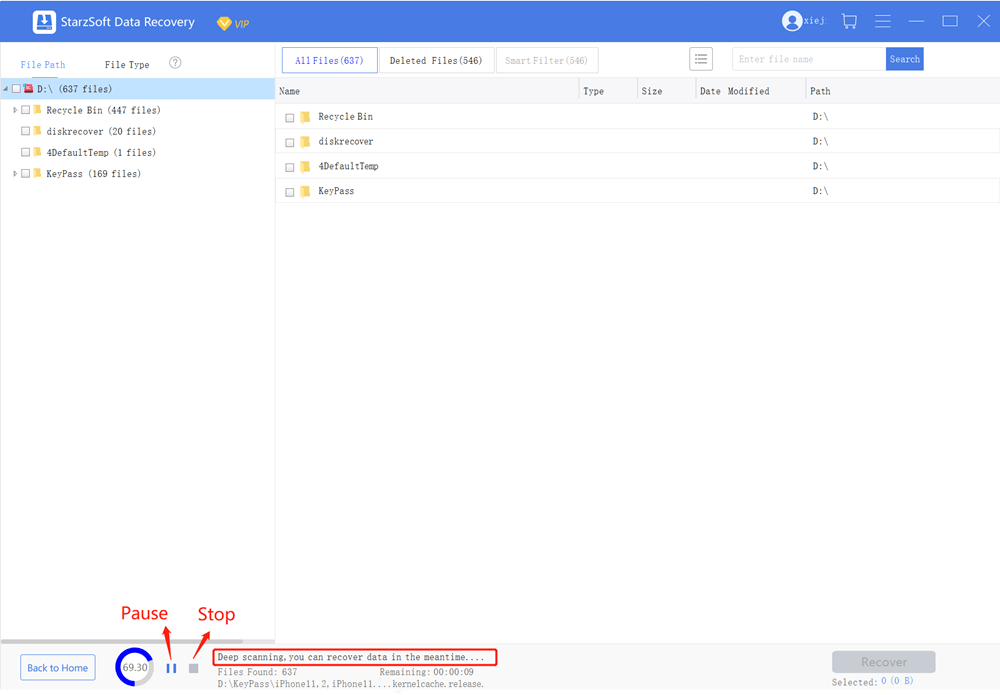
Note: During the scanning, you can pause or stop at any time. If you just need selected files and you can see them on the screen, you can pause or stop the scanning manually by pressing the “Pause” and “Stop” buttons at the bottom. You can also see an estimate of the amount of time left for the complete search to finish.
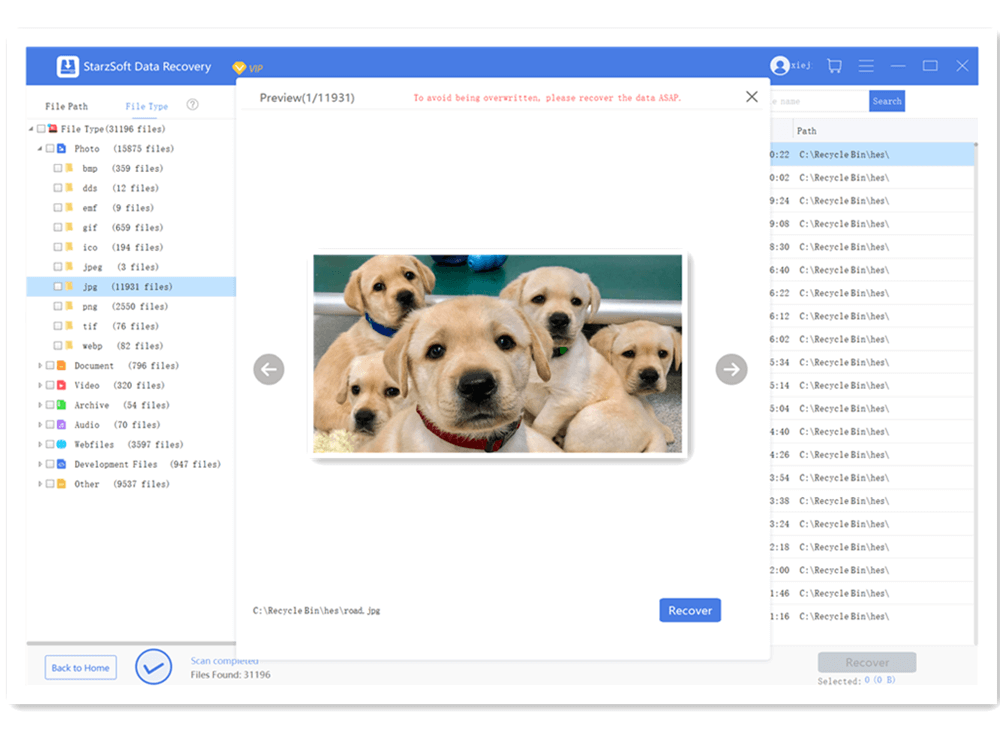
- Step 7: Once the scan is completed, you can preview the files and select the ones you need to recover. Then press the “Recover” button on the bottom right.
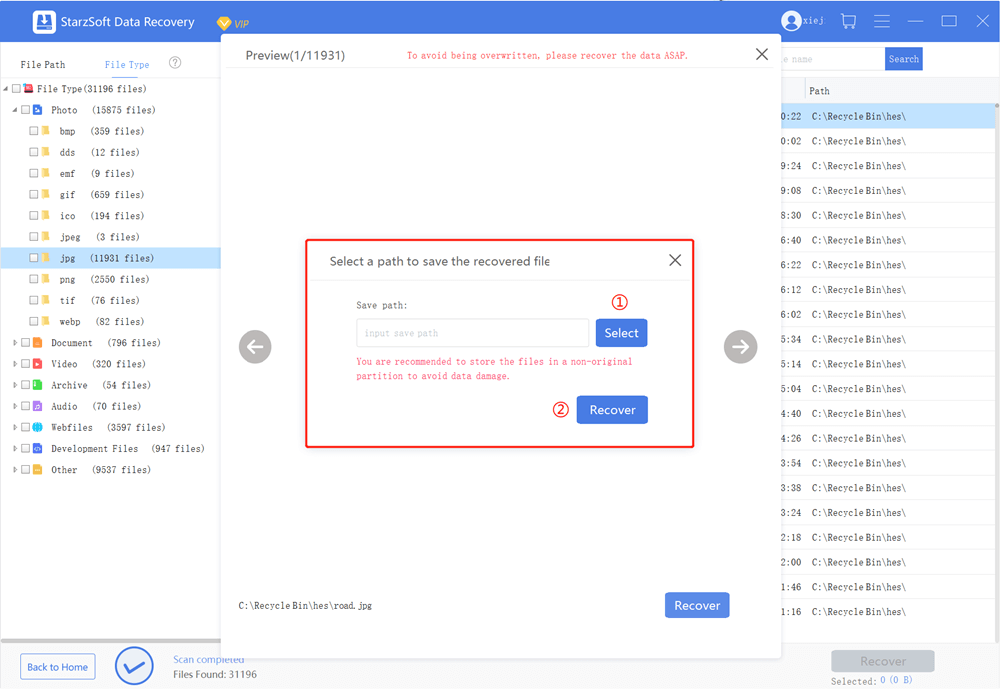
- Step 8: Now select a path on where you want to save the files and tap on recover. Want a while for the recovery to be completed.
And that is it! Your data should now be recovered and you can access them.
Final Words
Our computers are powerful devices but can often run into errors. However, troubleshooting these errors can often require formatting the drive. But if you find yourself not being able to turn on your computer properly, our detailed guide will help you to format hard drive from bios. And as a bonus, you can use the StarzSoft data recovery tool to quickly recover any lost data with ease. So what are you waiting for? Download StarzSoft Data Recovery for free and see if it works for you.
Free DownloadSecure Download