Memory is an integral part of your PC to function properly. Your computer won’t perform how you expect it to, given it doesn’t have enough RAM or memory.
However, several users have complained about facing the “Memory leak Windows 10” issue, and when this issue occurs, you can’t perform any activity on specific apps. Luckily, you can fix the “Windows Memory leak” issue, and we’ll tell you how.
Part 1: What Causes Windows Memory Leak?
The following reasons might cause the “Memory leak Windows 10” issue.
- Some apps might cover a lot of RAM, causing your issue.
- Using an outdated driver can also become the main culprit behind the “Win 10 memory leak” issue.
- The presence of a virus on your Windows PC could end up affecting the memory of the PC.
- A software issue is a key factor behind the situation you’re currently in.
- The specific app installed on the Windows 10 contains the bugs causing chaos.
Part 2: How to Fix Memory Leak Windows 10
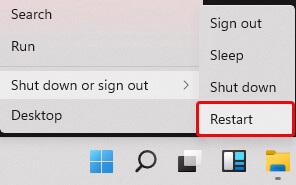
1. Restart the PC
The simplest and most reliable way to fix the “Memory leaks Windows 10” issue is to restart the PC. Doing so can help you fix the many software issues your PC might be struggling with. Here’s how to restart the PC.
- 1. Launch the Start Menu and choose the power icon.
- 2. Restart the PC by hitting the “Restart” icon.
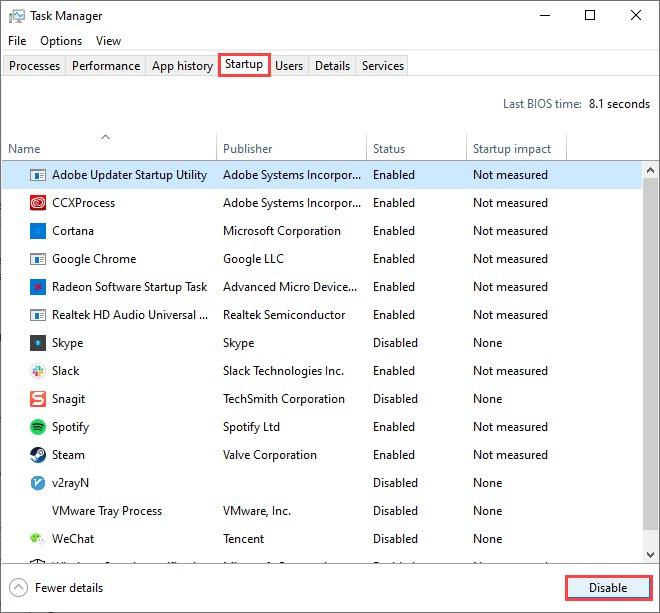
2. Disable Startup Programs
The startup program might be causing the “Windows 11 memory leak” issue. Thus, you can disable the startup program to see how it goes. Here’s how to disable the problematic app.
- 1. Launch the Task Manager and click the CTRL+Shift+ESC simultaneously.
- 2. Tap on the Startup icon and visit the program you’d like to disable on the Startup.
- 3. Click on the Disable icon and then restart the PC.
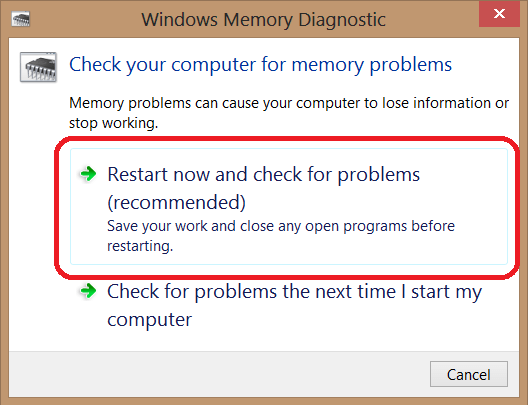
3. Use Diagnostic Memory Tools
Windows 10/11 offers the Windows Memory Diagnostic tool to scan and fix the computer’s RAM issues. Thus, you can eliminate the “Memory leak Windows” issue by running the Memory Diagnostic Tools.
- 1. Press the Start icon to navigate to the Windows search bar. Hit the Open icon after typing the Windows Memory Diagnostic.
- 2. Proceed ahead by selecting Restart Now and checking for the problems icon.
- 3. The PC will start rebooting into the Memory Diagnostic Tool before running the basic memory test.
- 4. Check for any errors after completing the test. Boot into Windows and press the ESC icon to quit the tool.
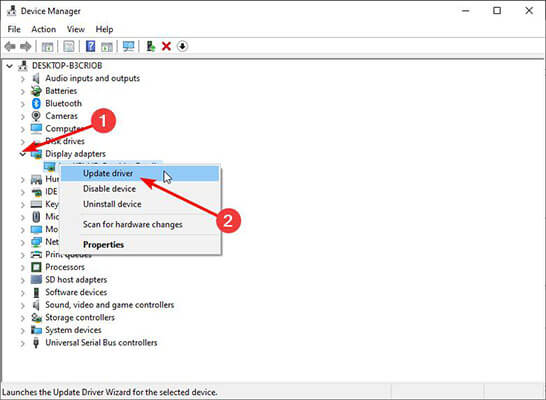
4. Update Your Device Drivers
You can also consider the outdated drivers the main reason behind the “Memory leak Windows 10” issue. Thus, updating the device drivers will be highly encouraged to fix your issue.
- 1. After visiting the Windows search bar, type in the Device Manager and hit the “Open” icon.
- 2. Navigate to the Device Manager Window and look for the device driver you want to update. Next, tap on the Update driver icon after right-clicking on the device.
- 3. Choose “Search automatically for drivers” under the “How you want to search for drivers” option.
- 4. Now, you’ll need to install the drives if they are available. Restart the PC once the drives get installed.
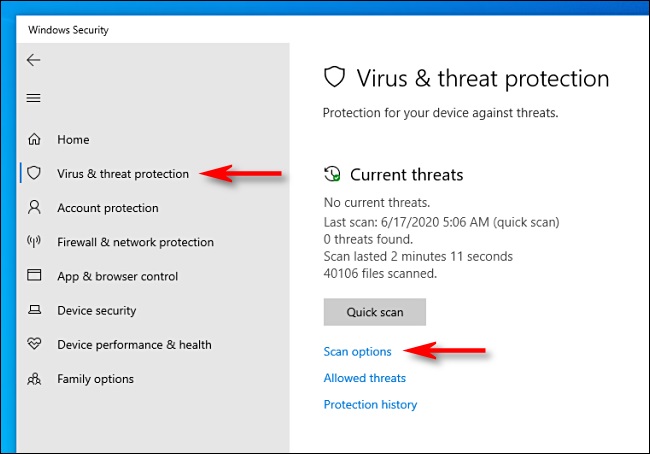
5. Run an Antivirus Scan
Running an Antivirus scan might help you to fix the “Windows memory leak” issue. Here’s how to do it.
- 1. Tap the Start Menu and type in Windows Security before hitting the Open icon.
- 2. Select the “Virus & threat protection” icon.
- 3. Select the Scan Now or Full-screen option. Doing so will allow the Anti-virus to scan the PC.
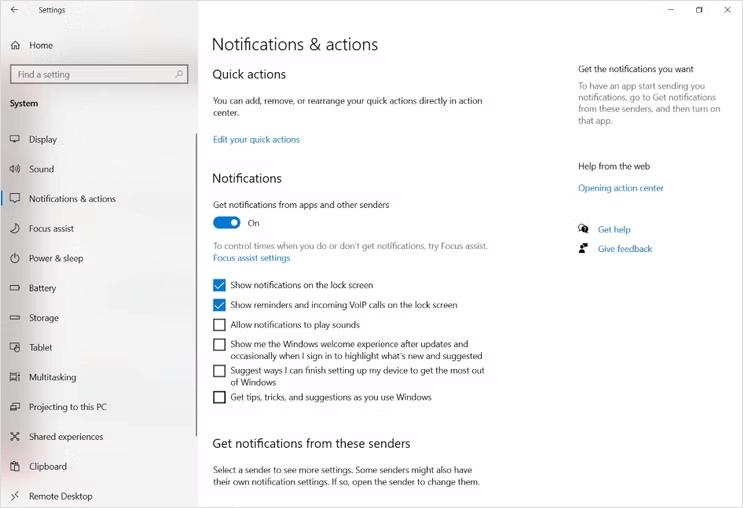
6. Disable Windows Tricks and Tips
Disabling the Windows Tricks and Tips might also assist you in tackling the “Memory leak Windows 10” issue.
- 1. Tap on the Settings icon after launching the Start Menu. Click the Notifications & Actions icon after choosing the “System” icon.
- 2. Uncheck the Get tips, tricks, and suggestions as you use Windows.
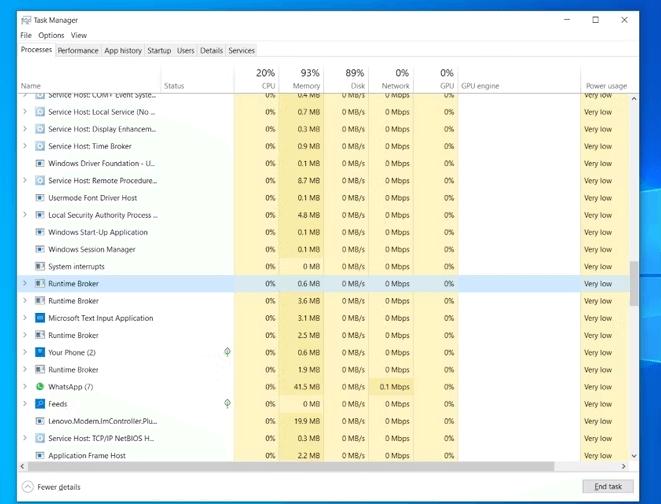
7. Disable Runtime Broker
Another way to fix the “Memory leak Windows 10” problem is to disable Runtime Broker.
Launch the Task Manager by pressing the CTRL+Shift+ESC. Next, press the Processes icon before hitting the Runtime Broker process. Close the End task icon after clicking on it.
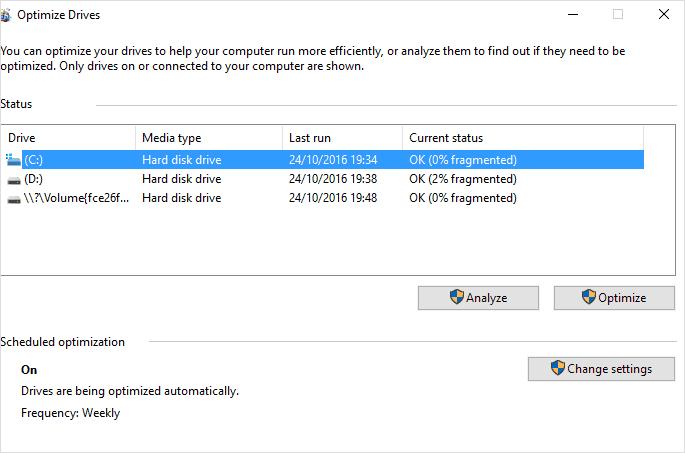
8. Defrag Hard Drives
Defragmenting your hard drive helps you to optimize the computer’s hard drive and fix the “Windows 10 memory leak” issue.
- 1. Launch “This PC” and tap on the current System hard drive before hitting the properties.
- 2. Navigate to the Tools and click on Optimize.
- 3. Tap on Optimize after selecting the drive you like to Defrag. Restart the PC once this process gets completed.
Part 3: How to Avoid Windows 10 Memory Leak
Facing the “Windows Memory leak” issue could be annoying, but you can prevent this issue. Here’s how to prevent getting affected by the “Windows 11 Memory leak” issue.
- Try to install more RAM after ensuring that you’ve got the enough RAM.
- You shouldn’t run multiple programs simultaneously, and don’t forget to quit the unnecessary programs.
- You need to ensure that you don’t open multiple tabs in the browser, as opening various tabs will consume a lot of RAM.
- Keep track of the amount of memory used by using the Resource Monitor, which helps you diagnose and detect memory leaks in Windows 11/10.
Part 4: How to Recover Lost Data Due to Win 10 Memory Leak
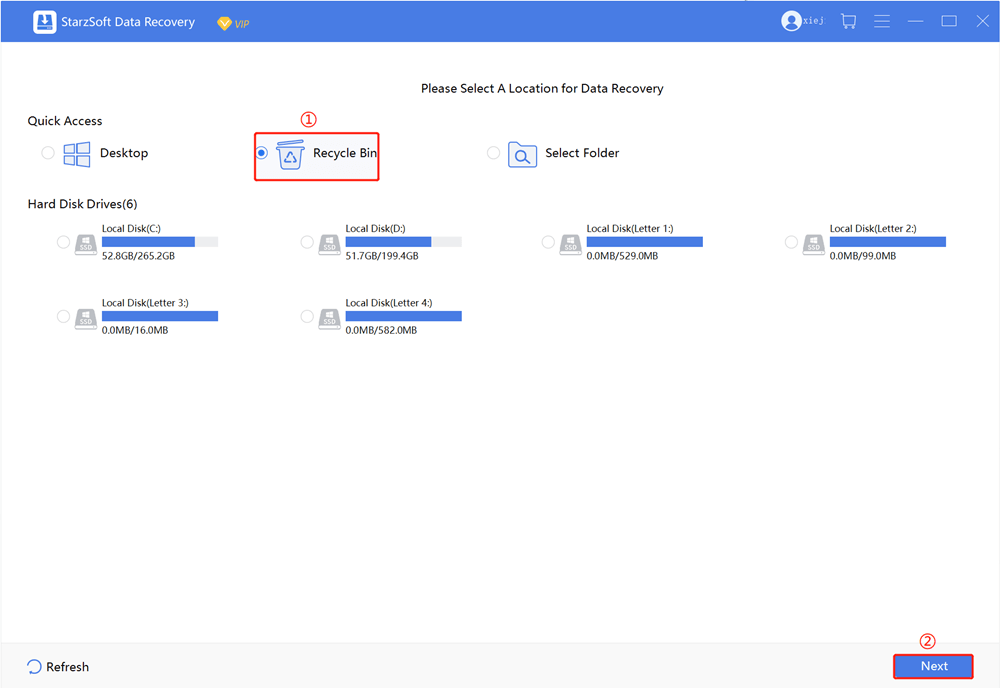
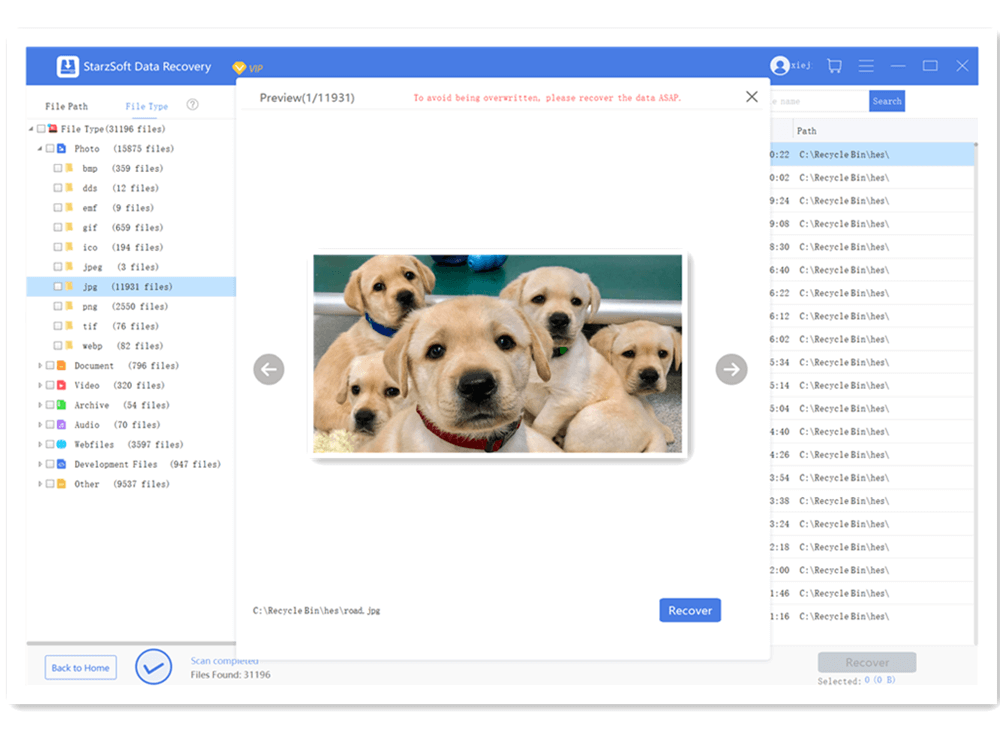
The “Memory leak Windows 10” issue might also cause significant data loss; you lose essential data. Starzsoft Data Recovery software allows you to retrieve lost data from multiple storage devices. With offering a simple user interface, StarzSoft Data Recovery software helps you to 1000+ data types.
Free DownloadSecure Download
- 1. Install the Starzsoft Data Recovery software and launch it afterward.
- 2. Scan the lost data after selecting the folder you’d like to retrieve the data from.
- 3. Preview the data and click on Recover to initiate recovering the lost data.
Part 5: FAQs about Memory Leak Windows 10
1. Can a memory leak affect the PC?
Although Memory leaks don’t affect Windows physically, they might cause the computer to slow down.
2. Does restarting the PC fix Memory leaks in Windows 10?
Restarting the computer might be the best way to tackle the “Windows memory leak” issue. Since RAM tends to store the information of running, restarting the PC will empty the RAM and might fix the memory leaking issue.
3. How do I know if my Windows 10 has a memory leak?
Your computer might start showing various symptoms, including slow applications running slow, decreased system performance, or inability to launch additional programs when the “Memory Leak Windows” issue occurs.
Conclusion
Apart from revealing the reasons behind the “Memory leak Windows 10” issue, we’ve also listed the appropriate solutions to fix the scare. You can also look at some of the key points that help you avoid affecting the “Windows 11 memory leak” issue.
If the “Memory leak Windows” issue causes the data loss, you might opt for the StarzSoft Data Recovery software to retrieve the lost data. This excellent software enables you to retrieve 1000+ data types.
Free DownloadSecure Download